Simple Confetti SB Tutorial
Simple Confetti SB Tutorial


Things Needed
*Paint Shop Pro (I did this using 9, but it should work with other versions)
*A Misted Tube of your choice Or a Regular Tube of your choice and Mask found Here
*Xenofex 1 - Shatter
Let's Get Started!
Make Sure Paint Shop Pro is not running while you install your Xenofex plugin
1. After you have that installed, You can now open your tube in Paint Shop Pro. Please also open your mask if you have chosen to use a regular tube. Choose 2 colors from your tube: a Light to Medium color, and a Darker color.
*A neat trick I like to do is I open 2 new images 100x100 and flood fill these with the 2 colors I have chosen so I don't lose them*
You can also set your light color as your foreground and your dark color as your background.
2. If you have chosen to use a regular tube, please continue on to steps 3 & 4. If you are using a misted tube, please skip ahead to step 5.
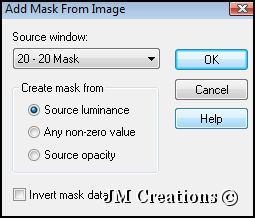
3. You should have 2 things open in Paint Shop Pro (Your tube and your mask). You can minimize your mask, make sure your tube is highlighted, and go to Layer/New Mask Layer/From Image and select your mask *see screenshot below*
Make sure Invert Mask Data is Not Checked

Make sure Invert Mask Data is Not Checked
4. Layers/Merge/Merge Group and you can now close out your mask.
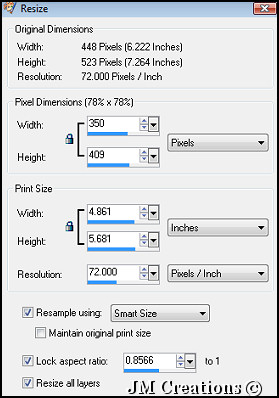
5. Now we want to make sure your tube is not wider than 350 wide. If it is, go to:
Image and then Resize and make sure the width doesn't exceed 350 *See Screenshot Below*

*Notice the Width of my tube is 448 Pixels, so I set it to resize Pixels and set the width to 350. With the Lock Aspect Ratio box Checked, your tube's height will self adjust*
6. Adjust/Sharpness/Sharpen
7. Edit/Copy and Minimize tube for later
8. Open a New Image 1400x the height of your graphic
If your screen resolution is larger than 1400 wide, you can adjust this number and make it larger
9. Flood fill with the dark color you have chosen.
10. Selections/Select All
11. *You should still have your tube in your clipboard's memory, but if you want you can go back to your tube and Edit/Copy*
Now with your new image selected go to Edit/Paste/Paste into Selection
12. Selections/Select None
13. Effects/Image Effects/Seamless Tiling and from the pull down Presets box at the top choose Default
14. Adust/Blur/Gaussian Blur with 20 as the Radius
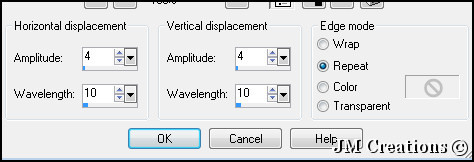
15. Effects/Distortion Effects/Wave with the settings shown below:

*Amplitude 4, Wavelength 10, and Repeat checked*
16. Effects/Plugin Effects/Xenofex 1.1/Shatter
From the Settings Pulldown Box, Choose Confetti
17. Effects/Image Effects/Seamless Tiling with the same settings we used before at default
18. Layers/New Layer
19. Flood fill this new layer with your second color (medium/lighter one)
20. Lower the Opacity of this layer 50-65 or what works best for you
21. Back to your tube....Edit - Copy
22. Highlight your Background Image and Edit/Paste/Paste as a new layer
23. Position the tube on the left side of your background
24. Add your Watermark and any text you would like....Drop shadow on text is your choice. I would suggest:
V&H=1, Opacity=50, Blur=2, Color=Black
25. Layers/Merge/Merge All Flatten
26. Optimize your graphic by going to File/Export/JPEG Optimizer and set the compression value to 20....Name it what you want to save it.
Assemble in Letter Creator :0)
Please credit Tutorial Back to Jodi M at:
Thank you for trying my tutorial. I hope it went well for you...
Please feel free to snag and share my tutorials after they have been released but please credit back to me in the footer..
If you are a tutorial writer and you would like to use my selections, masks, or other things please email me at jodimcreations@gmail.com
I do allow it, but I require a link back in your tutorial to my website here:
Thanks!!
Jodi M