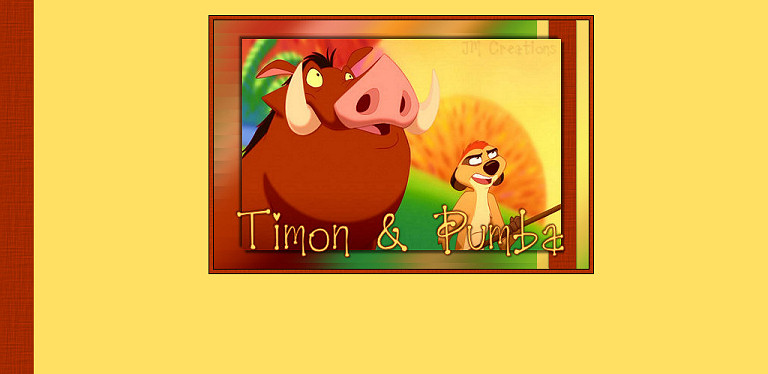
Strapped Side Stationery Set Tutorial
Strapped Side Stationery Set Tutorial


Things Needed For This Tutorial
**Paint Shop Pro (This is done using 9)
**A graphic of your choosing (One that is wider than it is tall will have to be used. Also a graphic that is at least 500 pixels wide)
**Kiwi Plugin Zig Zack found Here
**Font of your choice
**My VerticalSide1 Selection Found Here
Install this selection into your PSP Selections Folder before starting up Paint Shop Pro.....
Let's get started!!
1. Open up your graphic in PSP
Make sure your graphic is promoted to raster layer by going to Layers/Promote Background Layer
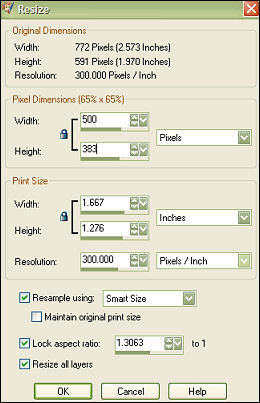
Also if it is not 500 pixels wide, go to Image/Resize/ and resize it as follows: Make sure your "Lock aspect ratio" box is checked so the height can self adjust.....

2. Adjust/Sharpness/Sharpen
3. Choose 2 colors from your graphic. We will be using one for the font and one for the side strap and header border..
You can either set these colors as your foreground and background colors in your color palette or you can open a new image 100x100 and flood fill it with your first color...Open another new image same size and flood fill with your second color. Now you have your colors handy to use later :0)
4. Layers/Duplicate
5. Adjust/Blur/Gaussian Blur and use 25
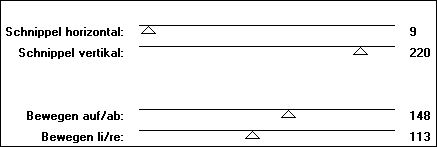
6. Effects and go to your Kiwi Plugins and click on Zig Zack and use the following settings:

7. If you think your lines aren't sharp enough and you'd like to brighten them up (this can happen with darker colors/graphics), you can go to Effects/Edge Effects/Enhance
**Of course this step is optional...If you think they look fine, you can skip this step**
8. Layers/Arrange/Send To Bottom
9. Make sure your top layer is your active layer and go to Image/Resize and resize it down 85%
10. Adjust/Sharpness/Sharpen
11. Effects/3D Effects/Drop shadow and use the following settings: V&H 4/Opacity 55/Blur 4/Color Black
12. Repeat the drop shadow but change the Horizontal and Vertical settings to -4
13. Click on your bottom layer in your Layers Palette and make it your active layer...
Then go to Layers/Add new Raster Layer
14. Selections/Load/Save Selections/Load Selections From Disk and click on your VerticalSide1_JM Selection
15. Flood fill with the color you have chosen for your side strap and header border...
16. Effects/Texture Effects/Texture and click on the Hatch Fine texture and use the settings that are there..
17. Effects/3D Effects with the following settings: V&H 1/Opacity 50/Blur 2/Color Black
18. Repeat drop shadow but change the Vertical and Horizontal to -1
19. Selections/Select None
20. Image/Add borders/ and add a 1 pixel black border
21. Image/Add borders/ and add a 5 pixel border in white
22. Image/Add borders/ and add a 1 pixel black border
23. Using your magic wand, select the white border we just did using the following settings:
24. Flood fill with the same color you just used for your side strap...
25. Effects/Texture Effects/Texture/ and use the Hatch Fine texture again like we did before....
26. Using the font you selected, add your text ....
27. You will need to promote your text to a raster layer so we can add a drop shadow to it so go to Layers/Convert to raster layer
28. Effects/3D Effects/Drop Shadow and use the following:
Vertical and Horizontal 2, Opacity 50, Blur 2
29. Add your watermark
30. Layers/Merge/Merge Visible
**This part is optional, but if you would like to resize your header, you should do this now....Just remember that after you resize, you will need to go to Adjust/Sharpness/Sharpen**
31. File/Export to JPEG Optimizer and optimize at 25...Name it and save
Background
1. Open a new image 45x300 and flood fill with the color you chose for your side strap and header border
2. Effects/Texture Effects/Texture/ and use the Hatch Fine texture again
3. Effects/Image Effects/Seamless Tile and use the following settings:
Tiling Method: Corner and Direction is Vertical
4. Image/Canvas Size 1400x300
If your screen resolution is larger than 1400, you can make the width larger to accomodate your needs
5. Layers/Add New Raster Layer
6. Layers/Arrange/Send to bottom
7. Flood Fill with either the color you chose for your font, or a different color from your graphic
8. File/Export to JPEG Optimizer and optimize at 25...Name and save
Arrange in Letter Creator and Credit Tutorial back to Jodi M at:
Thank you to my testers at Crazy Creative Creators!!
I hope you enjoyed my tutorial :0)
Please feel free to snag and share my tutorials after they have been released but please credit back to me in the footer..
If you are a tutorial writer and you would like to use my selections, masks, or other things please email me at jodim@norwaymi.com
I do allow it, but I require a link back in your tutorial to my website here:
Thanks
Jodi M