Glass Pyramids Frame and SB Tutorial
Glass Pyramids Frame and SB Tutorial


Things Needed:
Paint Shop Pro (this was done using 9 but should work in other versions)
Squares Mask found Here
Graphic of your choice (One that is wider than tall works best for this tutorial)
Simple Filters (Center Tile & Top Left Mirror)
Tramages (Glass Pyramids)
Making The Frame
1. Open graphic and mask in PSP and minimize mask
2. Duplicate graphic once and close out original
3. Choose 2 colors from your graphic..2 colors that are medium to dark in shade will work best. Pastel, bright, or light colors will not work for this tutorial...
Set one as the foreground color and the other as the background color..
4. Resize your graphic to 400 pixels wide. Make sure "Lock aspect ratio" box is checked so your height will self adjust. Also make sure you are resizing using Smart Size
5. Adjust/Sharpness/Sharpen
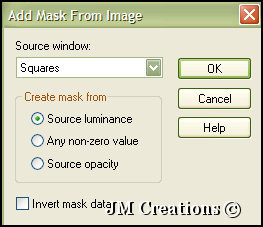
6. Layers/New Mask Layer/From Image and find your Squares Mask

7. Layers/Merge/Merge Group
8. Layers/Add new raster layer
9. Set your foreground to foreground/background gradient with the following settings: Angle 0/Repeats 0/Style Linear/Invert checked
10. Flood fill with gradient
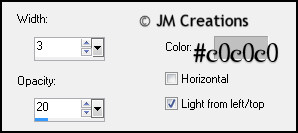
11. Effects/Texture Effects/Blinds
8. Layers/Add new raster layer
9. Set your foreground to foreground/background gradient with the following settings: Angle 0/Repeats 0/Style Linear/Invert checked
10. Flood fill with gradient
11. Effects/Texture Effects/Blinds

11. Layers/Arrange/Send to bottom
12. Layers/Merge/Merge Visible
13. Image/Add Borders/ and add a 2 pixel black border
14. Image/Add Borders/ and add a 15 pixel border in white
15. Using your Magic Wand Tool, select the white border

16. Flood fill with your gradient and leave it selected
17. Image/Flip
18. Effects/Plugins/Tramages/Glass Pyramids with divisions at 115
19. Image/Add Borders and add a 2 pixel black border
20. Image/Add Borders and add a 25 pixel border in white
21. Select your white border with your magic wand and flood fill with your gradient
22. Effects/Plugins/Tramages/Glass Pyramids with the same settings as last time (115)
23. Your border should still be selected at this point...Now go to Image/Mirror
24. Image/Add Borders and add a 3 pixel border using one of your chosen colors (the same one you will use as your background color)
25. Image/Add Borders and add a 3 pixel border either in black or your other color you chose
26. Add your watermark and then go to File/Export/JPEG Optimizer at 15 and save it...But don't close it out..
The Background
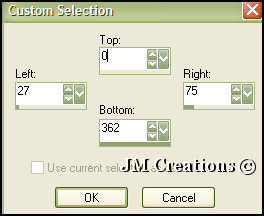
1. With your graphic still open, click on your selection tool and then "Custom Selection" with the following settings..

2. Edit/Copy
3. Edit/Paste/Paste as a new image
4. Effects/Image Effects/Seamless Tiling (Make sure Corner and Vertical are checked)
5. Effects/Plugins/Simple/Center Tile
6. Effects/Plugins/Simple/Top Left Mirror
7. Image/Canvas Size with the following settings:
8. Layers/New Raster Layer
9. Flood fill with one of your chosen colors..
10. Layers/Arrange/Move Down
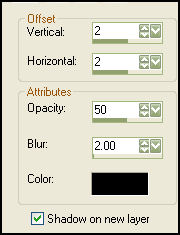
11. Highlight your top layer and go to Effects/3D Effects/Drop Shadow with the following settings:
3. Edit/Paste/Paste as a new image
4. Effects/Image Effects/Seamless Tiling (Make sure Corner and Vertical are checked)
5. Effects/Plugins/Simple/Center Tile
6. Effects/Plugins/Simple/Top Left Mirror
7. Image/Canvas Size with the following settings:
Width 1400/Height 362/Placement is Middle Left
8. Layers/New Raster Layer
9. Flood fill with one of your chosen colors..
This will be the color you chose as the first 3 pixel border from your frame from earlier...
10. Layers/Arrange/Move Down
11. Highlight your top layer and go to Effects/3D Effects/Drop Shadow with the following settings:

12. Effects/Image Effects/Seamless Tiling making sure Corner and Vertical are checked...
13. Layers/Merge/Merge All (Flatten)
14. File/Export to JPEG Optimizer and optimize at 15 and save...
Assemble your background and Frame/Header in Letter Creator and you are done :)
Please make sure to credit the tutorial back to JodiM at:
Please feel free to snag and share my tutorials after they have been released but please credit back to me in the footer..
If you are a tutorial writer and you would like to use my selections, masks, or other things please email me at jodim@norwaymi.com
I do allow it, but I require a link back in your tutorial to my website here:
Jodi M