SB Series Tutorial 2
Side Border Series Tutorial 2


Things Needed:
Paint Shop Pro (this was done using 9)
Graphic of your choice (one that is taller than wide will work best)
Masks Found Here
Font/Fonts of choice (Optional)
No outside plugins are used for this tutorial...
**All settings remain the same unless otherwise stated**
**Place your masks in your PSP Masks folder**
Let's Get Started
1. Open graphic in Paint Shop Pro..
Duplicate and close original
2. Resize your graphic so it is 300 pixels wide (Make sure lock aspect ratio is checked so your
height will self adjust. Also make sure you are using Smart Size)
3. Adjust/Sharpness/Sharpen
4. Layers/Promote Background Layer
5. Edit/Copy - Edit/Paste/Paste As A New Image (and you can minimize this copy for now)
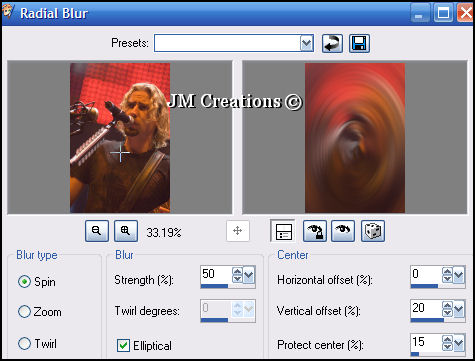
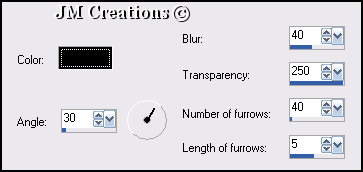
6. Adjust/Blur/Radial Blur:
7. Effects/Image Effects/Seamless Tile (Make sure Corner and Vertical are checked)
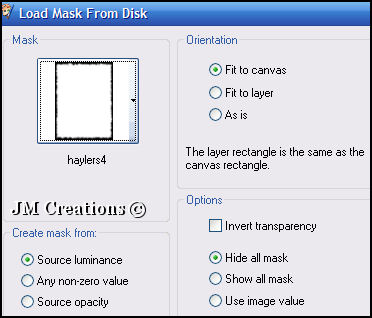
8. Layers/Load-Save Mask-Load Mask From Disk and load your Haylers 4 Mask:
9. Layers/Merge/Merge Group
10. Effects/3D Effects/Drop Shadow:
10. Effects/3D Effects/Drop Shadow:
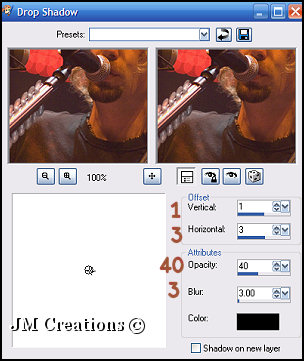
11. Repeat drop shadow but change the vertical to -1 and the horizontal to -3
12. Effects/Image Effects/Seamless Tile (Make sure Corner and Vertical are checked)
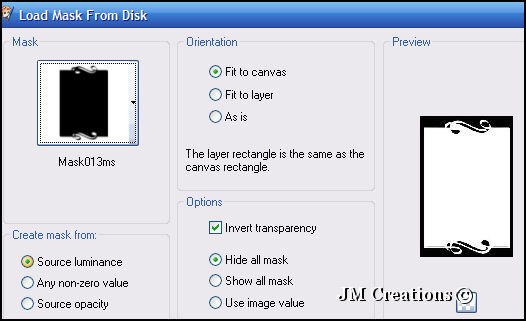
13. Bring your minimized graphic back up and go to Layers/Load-Save Mask/Load Mask From Disk and choose the Mask 013ms:
14. Layers/Merge/Merge Group
15. Image/Resize 90%
16. Adjust/Sharpness/Sharpen
17. Edit/Copy
18. Back to your previous image and Edit/Paste/Paste As New Layer
19. Effects/3D Effects/Drop Shadow and use the previous settings from Step 10
20. Layers/Merge/Merge Visible
21. Image/Canvas Size 1400xheight of graphic (Placement: Left-Middle Arrow)
If your screen resolution is larger than 1400 you can make this width bigger to accomodate your needs....
22. Layers/New Raster Layer
23. Layers/Arrange/Send To Bottom
24. Choose a complimenting color from your graphic and flood fill it in this layer
25. Effects/Texture Effects/Fine Leather:
26. Effects/Image Effects/Seamless Tile
27. Layers/Merge/Merge Visible
28. Add your watermark and any text you would like ... If you add text you can use the drop shadow we used previously..
29. When you are done adding your watermark and text merge visible
30. File/Export to JPEG Optimizer at 20 or what works best for your graphic
31. Name your graphic and save...Arrange in Letter Creator and please link this tutorial back to Jodi M at:
Thank you to my testers at Crazy Creative Creators!!
I hope you enjoyed my tutorial :0)
Please feel free to snag and share my tutorials after they have been released but please credit back to me in the footer..
If you are a tutorial writer and you would like to use my selections, masks, or other things please email me at jodim@norwaymi.com
I do allow it, but I require a link back in your tutorial to my website here:
Jodi M