SB Series Tutorial 3
Side Border Series Tutorial 3


Things Needed
Paint Shop Pro (this was done using 9 but other versions should work as well. If you use PSP Version 11, you will need the Fine Grain Cloudy Texture which is available at the link above or Here)
Graphic of your choice (one that is at least 350 pixels wide)
Let's Get Started...
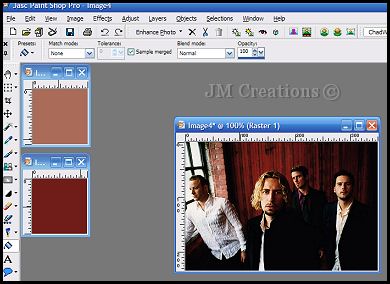
1. Open your graphic in PSP and duplicate once and close out original
2. Image Resize and resize graphic so it is 350 pixels wide (use Smart Size when resizing)
3. Adjust/Sharpness/Sharpen
4. Choose 2 colors from your graphic...A lighter to medium color and a darker color
5. Open new raster image 100x100
6. Duplicate once
7. Flood fill each of these new images with the colors you have chosen
8. When you have each of these boxes filled with your colors, move them over to the left hand side of your screen in PSP (this is to make what we will be doing next easier)
9. Back to your main image and Edit/Copy
10. Edit/Paste/Paste as a new image (we won't be using this again, but we are duplicating and saving just incase it disappears from your clipboard...You can now minimize this copy too..
11. Image/Add Borders and add a 1 pixel border in your lighter color (Just click on it over on your left hand side of screen with the eye dropper)
12. Image/Add Borders and add a 2 pixel border in dark color
13. Image/Add Borders and add a 5 pixel border in white
14. Using your magic wand tool, click on white border
15. Edit/Paste/Paste Into Selection
16. Effects/Texture Effects/Mosaic Antique and from the pulldown arrow at the top, choose Grid Small
17. Selections/Invert
18. Effects/3D Effects/Drop Shadow (V= 2, H= -2, Opacity= 45, Blur= 2, Color= Black
19. Selections/Select None
20. Image/Add Borders/ Add a 1 Pixel border in light color
21. Image/Add Borders and add a 2 pixel border in dark color
22. Image/Add Borders and add a 15 pixel border in white
23. Select white border with magic wand
24. Paste/Paste Into Selection
25. Effects/Texture Effects/Texture with the same settings (Grid Small)
26. Image/Mirror and then Selections/Select None
27. Image/Add Borders and add a 2 pixel border in light color
28. Image/Add Borders and add a 2 pixel border in dark color
29. Image/Add Borders and add a 2 pixel border in black
30. Image/Resize and resize 85%
31. Adjust/Sharpness/Sharpen
32. Layers/Promote Background Layer
33. Image/Canvas Size (width= the width of your graphic and the height= the height of your graphic plus 50) Placement is in the middle also:

34. Layers/New Raster Layer
35. Layers/Arrange/Send to bottom
36. Make sure bottom layer is selected and go to Selections/Select All
37. Edit/Paste/Paste Into Selection
38. Effects/Texture Effects/Mosaic Antique using the same Grid Small settings
39. Layers/New Raster Layer
40. Flood fill this new layer with your dark color and then lower the opacity to between 30 - 50 (whatever looks best for you)
41. Close out top layer (Graphic Layer), and make sure your second or bottom layer is the active layer and go to Layers/Merge/Merge Visible
42. Selections/Modify/Contract by 35
43. Selections/Invert
44. Edit/Clear
45. Selections/Select None
46. Effects/3D Effects/Drop Shadow and use the following settings: V & H= 2, Opacity= 45, Blur=2, Color= Black
47. Repeat drop shadow but change V & H to -2
48. Effects/Image Effects/Seamless Tile using Corner and Vertical as your settings
49. Unhide your top layer and make sure it's the active layer
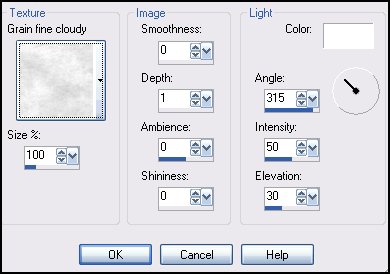
50. Layers/Merge/Merge Visible
51. Image/Canvas Size 1400xheight of your graphic. Placement is left middle arrow
52. Layers/New Raster Layer
53. Layers/Arrange/Send to bottom
54. Flood fill with your dark color
55. Effects/Texture Effects/Texture and choose the Grain Fine-Cloudy setting
56. Edit/Repeat Texture
57. Effects/Image Effects/Seamless Tile and tile at Default
58. Layers/Merge/Merge Visible
59. Add your watermark the way you would like to by either adding a new layer and doing it or adding it with text....or whatever (everyone does theirs differently)
60. Add text if you'd like to also and you can use the same drop shadow we have been using or one of your own...When you are done merge visible
61. File/Export/Export to JPEG Optimizer and Optimize at 15-20 ..Name your graphic and save it and assemble in Letter Creator.
Please credit tutorial back to Jodi M at:
http://www.jmcreationtuts.iwarp.com
Thank you to my testers at Crazy Creative Creators!!
Please feel free to snag and share my tutorials after they have been released but please credit back to me in the footer..
If you are a tutorial writer and you would like to use my selections, masks, or other things please email me at jodim@norwaymi.com
I do allow it, but I require a link back in your tutorial to my website here:
Thanks!!
Jodi M