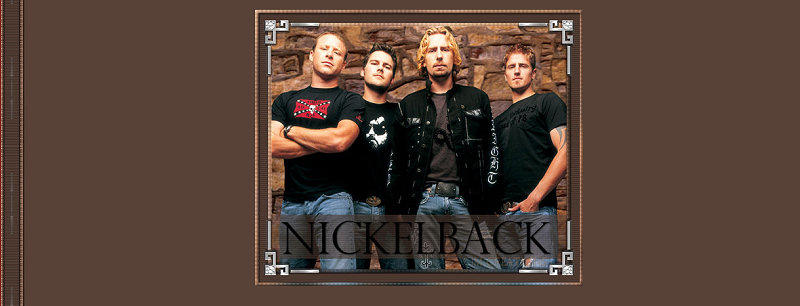
Cutting Out A Frame Stationery Tutorial
Cutting Out A Frame Stationery Tutorial


Thing Needed:
**Note: Corner tubes are not my creation. I snagged them through a group share**
**All settings remain the same unless otherwise stated**
**Unzip SelectedBox_JM selection and extract to your PSP/Selections folder**
Before We Get Started!
1. Open your graphic in PSP. Duplicate it once by holding down Shift + D. Close out original...
Also open one of the corner tubes included in zip file and minimize for now..
Your graphic needs to be 500x400 pixels in size.
For some of you advanced creators, you can always crop your graphic to meet this size requirement...
Or you can follow these instructions on getting your graphic ready for the tutorial:
1. Open a new raster image 500x400 pixels.
2. Go to Selections/Select All
3. Back to your main image and Edit/Copy (you can either minimize this graphic now or close it out, we won't need it anymore)
4. Make the new raster image active and go to Edit/Paste/Paste into Selection..
5. Selections/Select None
Your Image is now ready to begin!
1. If you didn't do the steps above and your graphic was the right size, you will need to complete step 2 below...
If you did do the steps above, you will probably not have to do step 2...
2. Layers/Promote Background Layer
3. Selections/Select All
4. Selections/Modify/Contract by 25
5. Selections/Invert
6. Adjust/Blur/Gaussian Blur at 20
7. Effects/Plugins/Penta.com/Color Dot
at the default settings ( Value=90, Distance=2, Color R/Color G/Color B=255)
8. Selections/Modify/Contract by 5
9. Edit/Clear
10. Selections/Invert
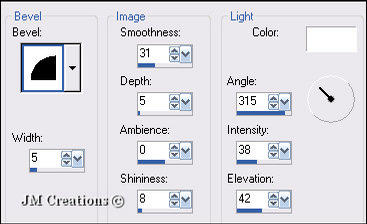
11. Effects/3D Effects/Inner Bevel

12. Effects/3D Effects/Drop Shadow with the following settings:
V&H= 2, Opacity=50, Blur=2, Color=Black
13. Selections/Select None
14. Layers/New Raster Layer
15. Layers/Arrange/Send To Bottom
16. Now click on your dropper tool
You are going to hover this over your graphic to find a color that will used for your background. When you find a color you would like to use, Click down your left mouse button to add it to your color palette...
17. Click on your Flood Fill tool and flood fill layer with your color choice
18.Effects/Texture Effects/Blinds with the following settings:
Width=3, Opacity=25, Color=Black, Horizontal and Light From Top/Left Boxes Checked
19. Layers/Merge/Merge Visible
20. Layers/New Raster Layer
21. Selections/Load Save Selections/Load selection from disk and choose SelectedBox_JM (the only boxes ticked should be Source Luminance and Replace Selection)
22. Flood fill with your background color
23. Selections/Select None
24. Effects/Texture Effects/Blinds
25. Lower opacity of this layer to somewhere between 50 - 70
26. Layers/Merge/Merge Visible
27. Make your corner tube active and
go to Edit/Copy
28. Back to your graphic and Edit/Paste/Paste as a new layer
29. Position the corner tube in top left corner of graphic
30. Effects/3D Effects/Drop Shadow
31. Effects/Plugins/Simple/Top Left Mirror
32. Now You can put your text in the bottom box of your graphic. Position it so it is centered nicely
33. Once you have placed your text in the box, go to Layers/Convert to raster layer
34. You can now add a drop shadow to your text. You can use your own settings or mine:
V&H=1, Opacity=50, Blur=2, Color=Black
35. Add your watermark to your graphic and go to Layers/Merge/Merge Visible
36. Time to save your header. Go to File/Export/Export to JPEG Optimizer and optimize at 15 - 20 or whatever you prefer...
Don't Close Out Image!! We will need it to do our background...
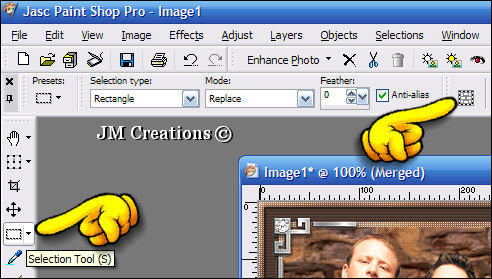
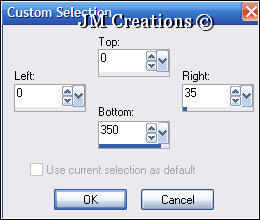
1. Click on your selection tool and then custom selection

and use these settings:

2. Edit Copy/Edit Paste/Paste As A New Image
3. Effects/Plugin Effects/Simple/Top Left Mirror
4. Effects/Image Effects/Seamless Tiling and make sure Edge and Vertical are checked...
5. Image/Canvas Size 1400x350 Position is left middle arrow
6. Effects/3D Effects/Drop Shadow with these settings:
V&H=2, Opacity=50, Blur=2, Color=Black, Shadow on new layer box is checked
7. Effects/Image Effects/Seamless tiling
8. Layers/Merge/Merge Visible
9. Layers/New Raster Layer
10. Layers/Arrange/Send to bottom
11. Flood fill with your background color
12. File/Export to JPEG Optimizer and optimize between 15 - 20...
Assemble in Letter Creator
Link tutorial back to Jodi M at:
Thank you to my testers at Crazy Creative Creators!!
I hope you enjoyed my tutorial :0)
Please feel free to snag and share my tutorials after they have been released but please credit back to me in the footer..
If you are a tutorial writer and you would like to use my selections, masks, or other things please email me at jodim@norwaymi.com
I do allow it, but I require a link back in your tutorial to my website here:
Jodi M