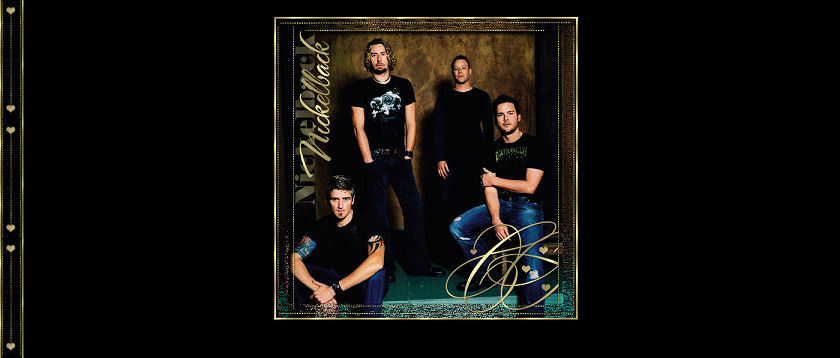
Fancy Gold Accents Tutorial V1
Fancy Gold Accents Tutorial V1


Things Needed:
 Paint Shop Pro (This was done using 9)
 Graphic of your choice (One that has a black background or very dark back works best)
 Embellishments and/or Brushes of your choice
 Tramage Plugin (Wee Scratches) Found Here
 Gold Pattern of Your Choice (or mine is in zip file above)
Make sure it is installed into your Pattern
Folder in PSP before starting..
Also make sure the brushes you wish to use are installed in PSP prior to Opening up PSP to begin this tutorial :)
.....Let's Begin.....
1. Open your graphic of choice
**Your graphic size does not matter because you can resize later. Because it is a Header though I would recommend it be at least 500 pixels in width and no larger than 600x600. If your graphic is to large, when you go to resize at the end, it may lose pixel quality and clarity**
2. Selections/Select All
3. Selections/Modify/Contract by 3
4. Selections/Invert
5. Layers/New Raster Layer
6. Flood fill with your gold pattern and then you can go to Select/Select None
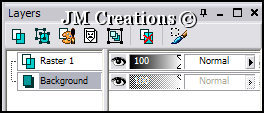
7. Make sure the bottom layer is your active layer:

8. Selections/Select All
9. Selections/Modify/Contract By 20
10. Selections/Invert
11. Effects/Plugin Effects/Tramages - Wee Scratches and use 255
12. Adjust/Sharpness/Sharpen
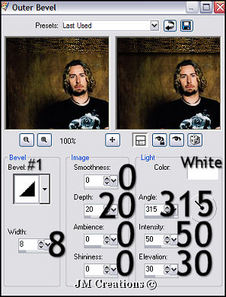
13. Effects/3D Effects/Outer Bevel with the settings below:
9. Selections/Modify/Contract By 20
10. Selections/Invert
11. Effects/Plugin Effects/Tramages - Wee Scratches and use 255
12. Adjust/Sharpness/Sharpen
13. Effects/3D Effects/Outer Bevel with the settings below:

14. Selections/Invert
15. Layers/Add New Raster Layer
16. Effects/3D Effects/Cutout using these
settings:
Vertical -2, Horizontal 2, Opacity 50, Blur 5, Color Black
17. Selections/Select None
18. Layers/Merge/Merge Visible
19. Now click on your Pen Tool

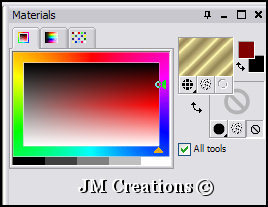
And set your Palette with your gold texture
like below:

Your Pen Tool Settings should look like this: I'm using Diamonds for my line style and the width is 2...

20. Draw Gold lines wherever you would like them on your graphic. If you would like each line to be on a separate layer, after each one go to Layers/Convert to Raster Layer.
What I did for mine was I made one at the top and converted it to a raster layer, duplicated once and flipped. I did the similar thing to the line I added to the side. I duplicated it, and then mirrored it. Saves time :)
21. Now you can add text and gold embellishments or brush effects if you wish.
When you have it finished, add your watermark.
22. Layers/Merge/Merge Visible
23. File/Export to JPEG Optimizer and Optimize at 20 (or whatever you'd like)
Background:
1. Open a new raster image 35x200
2. Flood fill with Black or a dark color from your graphic
3. Using your Pen Tool with the settings from earlier, draw some lines...
Again you can add your own gold embellishments if you'd like to. Just make sure your lines and any added things are fairly centered.
4. Layers/Merge/Merge Visible
5. Image/Canvas Size 39x200 placement is in the middle
6. Layers/Add New Raster Layer
7. Flood fill with gold and send this layer to the bottom (and make sure this bottom layer is the active layer)
8. Effects/Image Effects/Seamless Tiling
Using Corner and Vertical
9. Layers/Merge/Merge Visible
10. Image/Canvas Size 1400x200
11. Layers/New Raster Layer
12. Flood fill with black or your dark color and send this layer to the bottom
13. Layers/Merge/Merge Visible
14. File/Export to JPEG Optimizer at 20
Assemble your background and Frame/Header in Letter Creator and you are done :)
Please make sure to credit the tutorial back to JodiM at:
Please feel free to snag and share my tutorials after they have been released but please credit back to me in the footer..
If you are a tutorial writer and you would like to use my selections, masks, or other things please email me at jodim@norwaymi.com
I do allow it, but I require a link back in your tutorial to my website here:
Thanks!!
Jodi M