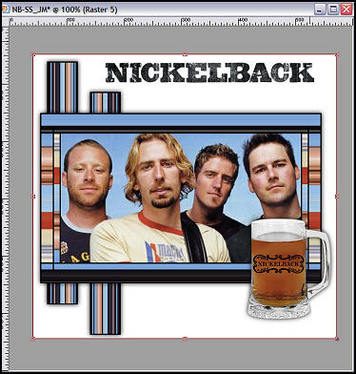
Fantastic Stripes Tutorial
Fantastic Stripes Tutorial
Download Fantastic Stripes Tutorial Here


Supplies Needed:
 Paint Shop Pro (Tutorial written in PSP 9)
 Graphic of your choice that is at least 420x225 pixels in size
 Accent Tubes of your choice (Optional)
 Font of choice (Optional)
 Stripes Are In Plugin found Here
(Listed under Horizon Stripes)...Please extract and place in your PSP Plugins folder
Let's Get Started!
**Please note all settings remain the same unless otherwise stated**
1. Open a New Raster Image 420x225
Also make sure you have the graphic you will be using and any accent tubes you will be using open in PSP...accent tubes can be minimized, as we won't be using them til the end
2. For this next step, it can be done a couple of different ways. For advanced users, you can crop your graphic so that the dimensions are 420x225. After you have done this, copy your new cropped graphic, and paste it as a new layer on your blank raster image.
For those not comfortable doing it this way, you can do it this way instead:
With your main graphic active, go to Edit/Copy (you can minimize this now we shouldn't be needing it anymore)
On your new blank raster image, go to Paste/Paste as a new layer...
You can use your mover tool to move your graphic around to get the part of the graphic you would like to use...but if it's to large, you will have to resize first..
To resize just your graphic (Not all layers) until it looks ok..
Go to Image/Resize and resize to where you think it should fit ok. Somewhere between 70 - 80% may work
but all graphics are not the same size, so you will have to play with it until you get it to fit. Resize it using "Smart Size" and make sure "Resize all layers" is NOT checked...
After you have resized, you may also need to sharpen so go to Adjust/Sharpness/Sharpen...
3. Once you have your graphic all set to go and it is sized 420x225, go to Layers/Merge/Merge Visible
4. Edit/Copy
5. Edit/Paste/Paste as a new image and minimize (we are only saving it incase it's not in your clipboard later)
6. Image/Add border and add a 2 pixel black border
7. Image/Add border and add a 10 pixel border in white
8. Select your white border using your magic wand:

9. Edit/Paste/Paste into Selection
10. Effects/Plugins/Horizonaus Mixed Bag/Stripes Are In with the default settings: Mixer 1=100 , Mixer 2=100
11. While still selected, go to Image/Flip
12. Selections/Select None
13. Image/Add Border/ and add a 2 pixel black border
14. Image/Add Border and add a 20 pixel white border
15. Select white border with your magic wand
16. Edit/Paste/Paste into Selection
17. Effects/Plugins/Stripes are in. You can now go to Selections/Select None...
18. Image/Add Border and add a 2 pixel black border.
19. Edit/Copy
20. Open a new raster image 600x600
21. Edit/Paste/Paste as a new layer
22. Add a drop shadow of H&V=0, Opacity=100, Blur=12, Color=Black
23. Open a new raster image 420x50
24. Selections/Select All
25. Edit/Paste/Paste into Selection
26. Select None
27. Effects/Plugins/Stripes are in
28. Image/Add Border/ add a 2 pixel black border
29. Image/Rotate/Free Rotate left 90 degrees and make sure all layers is checked
30. Shift + D to duplicate
31. Put this duplicated one off to the side for a minute and make the original copy the active image.....
32. Layers/Promote Background Layers
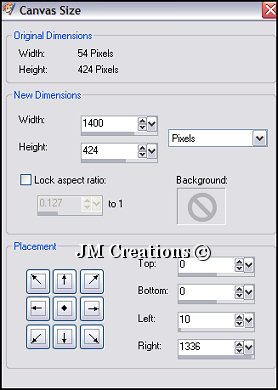
33. Image/Canvas Size:
10. Effects/Plugins/Horizonaus Mixed Bag/Stripes Are In with the default settings: Mixer 1=100 , Mixer 2=100
11. While still selected, go to Image/Flip
12. Selections/Select None
13. Image/Add Border/ and add a 2 pixel black border
14. Image/Add Border and add a 20 pixel white border
15. Select white border with your magic wand
16. Edit/Paste/Paste into Selection
17. Effects/Plugins/Stripes are in. You can now go to Selections/Select None...
18. Image/Add Border and add a 2 pixel black border.
19. Edit/Copy
20. Open a new raster image 600x600
and flood fill with white
21. Edit/Paste/Paste as a new layer
22. Add a drop shadow of H&V=0, Opacity=100, Blur=12, Color=Black
23. Open a new raster image 420x50
24. Selections/Select All
25. Edit/Paste/Paste into Selection
26. Select None
27. Effects/Plugins/Stripes are in
28. Image/Add Border/ add a 2 pixel black border
29. Image/Rotate/Free Rotate left 90 degrees and make sure all layers is checked
30. Shift + D to duplicate
31. Put this duplicated one off to the side for a minute and make the original copy the active image.....
32. Layers/Promote Background Layers
33. Image/Canvas Size:
1400x424 placement is middle left arrow. Leave all settings except change left to 10:

34. Effects/3D Effects/Drop Shadow
**use previous settings**
35. Effects/Image Effects/Seamless Tiling using corner and vertical...
36. Layers/New Raster layer
37. Layers/Arrange/Send To Bottom
38. Flood fill this layer with white
39. File/Export and export to JPEG optimizer at 15 - 20
You can now close this background, as we won't be using it again....
40. We will now be using our other copy of our striped bar so make this the active image and go to Edit/Copy (you can now close this as we won't be needing it again...
41. With your main image your active one, go to Edit/Paste/Paste as a new layer
42. Move this layer so it is behind your graphic. You can either drag it down in your layers palette or go to layers/arrange/move down
43. Using your mover tool, position it on the left side of your graphic
44. Effects/3D Effects/Drop Shadow
45. Layers/Duplicate
46. Using your mover tool, move this layer over and slightly lower than the other one...
47. Add any accent tubes you would like to now, making sure to also add a drop shadow to them...
48. If you would like to add text, please do and then apply a drop shadow with the following settings:
H&V=1, Opacity=50, Blur=2, Color=Black
49. Add your watermark and then go to Layers/Merge/Merge Visible
50. Now click on your crop tool:

51. The settings I use for my crop tool are:
Width=1, Height=1, Unit=Pixels, Top, left, right and bottom are 0
52. Now make a box around your image using the crop tool. What we are doing is basically trimming away the excess white around the edges to make the header smaller:

53. When you are finished you can either double click in the middle of your graphic or hit the check mark in your crop settings tool bar...
54. File/Export to JPEG optimizer, Save and assemble in Letter Creator!!
I hope you enjoyed this tutorial and your results were good ones :)
Please make sure to credit the tutorial back to JodiM at:
Please feel free to snag and share my tutorials after they have been released but please credit back to me in the footer..
If you are a tutorial writer and you would like to use my selections, masks, or other things please email me at jodim@norwaymi.com
I do allow it, but I require a link back in your tutorial to my website here:
Thanks!
Jodi M