Side Border Series Tutorial 5
Side Border Series Tutorial 5


Things Needed:
 Paint Shop Pro (This was done using 9 but other versions should work)
 Metal Frame and Accent Tubes Found in supply zip at above download link
 Graphic and Font of choice (Graphic will need to be square in shape)
***Please note that all settings remain the same unless otherwise stated***
Let's Get Started!!
1. Open graphic and tubes found in my supplies zip in PSP
2. Minimize everything except the metal frame and your graphic
**This step is optional, but if you'd like the metal frame to be gold instead of silver, you can change it by going to Adjust/Hue and Saturation/Colorize with the following settings: Hue=36, Saturation=134 (This can also be done with the accents if you wish**
3. Open a new image 400x400
4. Make the metal frame your active image and go to Edit/Copy (you can now close this out)
5. Make the new image you just opened the active image and go to Edit/Paste/Paste as New Layer
6. Now make your graphic your active image. It will need to be square (same width and height) for it to turn out with the best results.
**Instructions only if your graphic is not square**
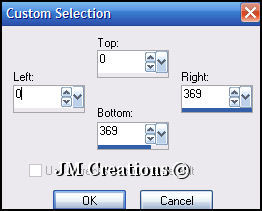
If your image is not square, take note of the width of it and go to Selection. Then Custom Selection:
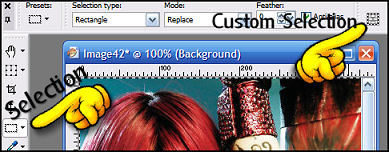
In here you will make the width and the height the same: The Right and Bottom number should be the same...
Now go to Edit/Copy and then Edit/Paste/Paste as a New Image. You can close out your original graphic. You will be using this squared one :)
7. Now back to the tutorial!! lol
With your graphic being the active image go to Edit/Copy (You can now minimize this)
8. Make your image with the metal frame your active image. Go To Layers/Merge/Merge Visible
9. Now click on your magic wand tool with the following settings:
Mode=Replace, Tolerance and Feather at 0, Sample Merged, Contiguous, and Antialias checked, and Outside...
10. Using your magic wand tool with the settings above, click on the inside of the metal frame. There are the 4 corners and the middle (for a total of 5 places). You do this by holding down the Shift Key as you are clicking with your wand tool:

11. Now go to Selections/Modify/Expand and Expand by 2
12. Layers/New Raster Layer
13. Edit/Paste/Paste Into Selection
14. Selections/Select None
15. Layers/Arrange/Send To Bottom
16. Now make your top (Frame Layer) active and add a drop shadow by going to Effects/3D Effects/Drop Shadow with the following settings:
V&H=0, Opacity=100, Blur=12, Color=Black
17. Layers/Merge/Merge Visible
18. You can now add any accents you'd like to your frame. If you would like to add the diamond accents, bring up the diamonds_JM tube and go to Edit/Copy (You can now either minimize this or close it out)
19. Now make your framed image your active image and go to Edit/Paste/Paste as a New Layer. They should be centered in the right place on your frame. Add a drop shadow with the same settings as we used previously...
Of course this is optional and if you do not wish to use the diamonds, you can use any other or no accents...You can use the same drop shadow to the accents you use..
20. After you have added your accents and you are happy with the placement of them, go to Layers/Merge/Merge Visible
21. Now go to Image/Canvas Size and size it 1400x400 with the placement being the middle left hand arrow
22. Now using your dropper tool, choose a dominant color from your graphic. Black will not work....
23. Layers/New Raster Layer
24. Layers/Arrange/Send to Bottom and flood fill with the color you have chosen
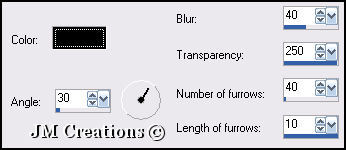
25. Making sure your bottom layer is the active layer go to Effects/Texture Effects/Fine Leather with the following settings:
26. Effects/Image Effects/Seamless Tile and tile using the default settings
27. Layers/Merge/Merge Visible
28. You can now add text if you'd like to and use a drop shadow of your choice or the following settings:
V&H=1, Opacity=50, Blur=2, Color=Black
29. Add your watermark and go to Layers/Merge/Merge All (Flatten)
30. Now go to File/Export/Export to JPEG Optimizer and optimize at anywhere between 15 and 20 (or whatever you prefer)...
Assemble in Letter Creator and please credit tutorial back to me at http://www.jmcreationtuts.iwarp.com
I hope you enjoyed my tutorial :0)
Please feel free to snag and share my tutorials after they have been released but please credit back to me in the footer..
If you are a tutorial writer and you would like to use my selections, masks, or other things please email me at jodim@norwaymi.com
I do allow it, but I require a link back in your tutorial to my website here:
Thanks to my testers at CCC Testers too...You guys are the best!!
Thanks!
Jodi M
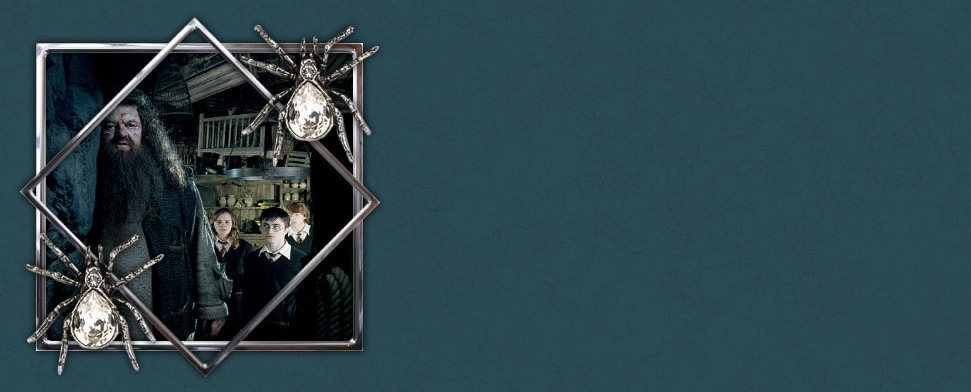
Another Example