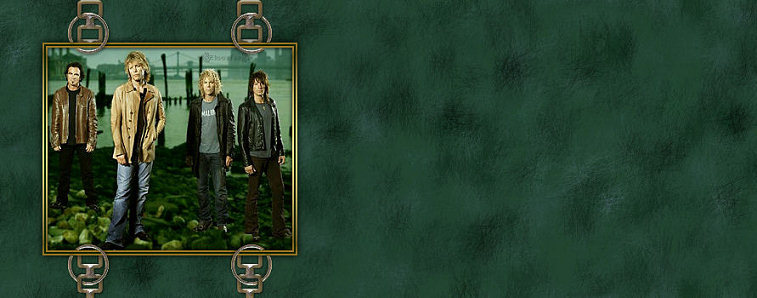
Suspended In Chains Tutorial
Suspended In Chains Tutorial By ZIggyFan and Jodi M


Things Needed:
 Paint Shop Pro (This was done using 9)
 Selections
 A silver or gold pattern of your choice (Please put in your patterns folder)
 A graphic of your choice that needs to be sized around 288x238
 Eye Candy 4000 Chrome Setting Found Here
 Simple Filters Top Left Mirror Found Here
Supplies can be downloaded with Tutorial above or Here
*******************************************************************************************************
*******************************************************************************************************
Please put the selections in your PSP/Selections Folder and the Silver or Gold pattern in your Patterns folder before opening up PSP
*******************************************************************************************************
*******************************************************************************************************
1. Open graphic in PSP. Graphic needs to be no larger than 288x238. If your graphic is not this size please resize or crop it down. After resizing please remember to sharpen your graphic if needed too. Then Go to Edit/Copy and you can minimize it....
2. Open a new raster image 400x350 transparent background
3. Layers/New Raster Layer
4. Selections/Load Save Selections/Load from disk and load the ChainsSB_JM selection
5. Flood fill selection with your silver or gold pattern
6. Effects/Plugins/Eye Candy 4000 Chrome with the settings below:
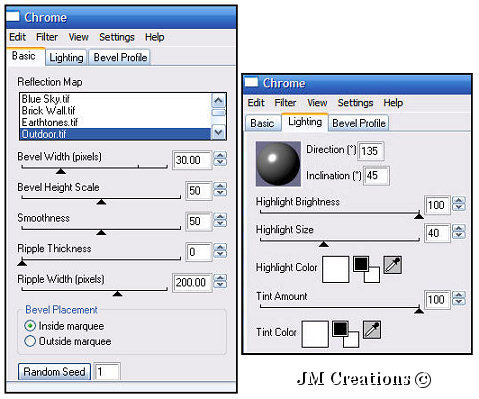
7. Effects/3D Effects/Drop Shadow with the following settings;
V&H=1, Opacity=50, Blur=2, Color=Black
8. Repeat Drop Shadow but change V&H to -1
9. Layers/Merge/Merge Visible
10. Selections/Select None
11. Layers/New Raster Layer
12. Selection/Load Save Selection From Disk and load the SBBoxed_JM selection
13. Flood fill with your silver or gold patter
14. Selections/Modify/Contract/Contract by 2
15. Edit/Clear
16. Flood fill with Black or a dark color from your graphic
17. Selections/Modify/Contract/Contract by 2
18. Edit/Clear
19. Flood fill with your silver or gold pattern
20. Selections/Modify/Contract/Contract by 2
21. Edit/Clear
22. Effects/3D Effects/Cutout with the following settings;
V&H=2, Opacity=50, Blur=5, Color=Black
23. Layers/New Raster Layer
24. Effects/3D Effects/Cutout and change the V&H to -2
25. Layers/Merge/Merge Down
26. Your graphic should still be in your clipboard, but if it isn't bring it back up and go to Edit/Copy (you can minimize it again)
27. Back to your SB image....Go to Edit/Paste/Paste as New Layer
28. Layers/Arrange/Move Down
29. Selections/Select None
30. Close out your bottom or Chains layer and go to Layers/Merge/Merge Visible
31. Effects/3D Effects/Drop Shadow:
V&H=0, Opacity=100, Blur=12, Color=Black
32. Unhide your bottom layer and go to:
Layers/Merge/Merge Visible
33. Layers/New Raster Layer
34. Selections/Load Save Selections/Load From Disk and load the MetalRing_JM selection
35. Flood fill with your silver or Gold pattern
36. Effects/Plugins/Eye Candy 4000 Chrome (Change the settings so it looks like below)
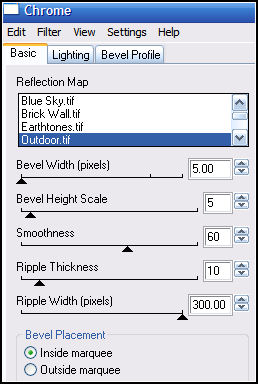
37. Effects/3D Effects/Drop Shadow:
V&H=1, Opacity=65, Blur=6, Color=Black
38. Selections/Select None
39. Effects/Plugins/Simple/Top Left Mirror
40. Layers/Merge/Merge Visible
41. Image/Canvas Size at 1400 X 350....or the width you use for your Screen resolution....
42. Select a complimenting color from your graphic. Add a new Raster layer, flood fill this new layer with the color you have chosen, and send this layer to the bottom.
43. Effects/Texture Effects - Straw Wall with the following settings:
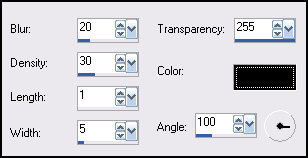
44. Effects/Edge Effects - Enhance
45. Effects/Art Media Effects - Brush Strokes with the following settings:
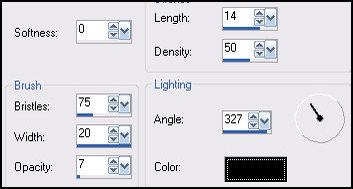
46. Effects/Image Effects/Seamless Tile and tile it using the default settings.
47. You can add any text you would like and your watermark. Once you are done merge all layers.
48. To save your image go to File/Export and export the JPEG Optimizer and Optimize at anywhere between 15 and 20 or whichever setting you prefer :)
Assemble in Letter Creator and You are done!!
Hope your results were great ones :)
Thank you for trying our tutorial & also thanks goes out to our wonderful Tut testers at Crazy Creative Creators...
Please link tutorial back to our testers group at:
You can find Amy/ZiggyFan's Tutorials at her website here:
You can find Jodi M's Tutorial Creations here:
If you are a tutorial writer and you would like to use our selections, masks, or other things that we create ourselves to use for our tutorials please email use at either jodim@norwaymi.com or ziggyfan@sbcglobal.net first to ask our permission.
We do allow it, but only for those that ask permission!
Thanks!
ZiggyFan and Jodi M
Another Example
