Fanatical Collaboration Stationery Tutorial
Fanatical Collaboration
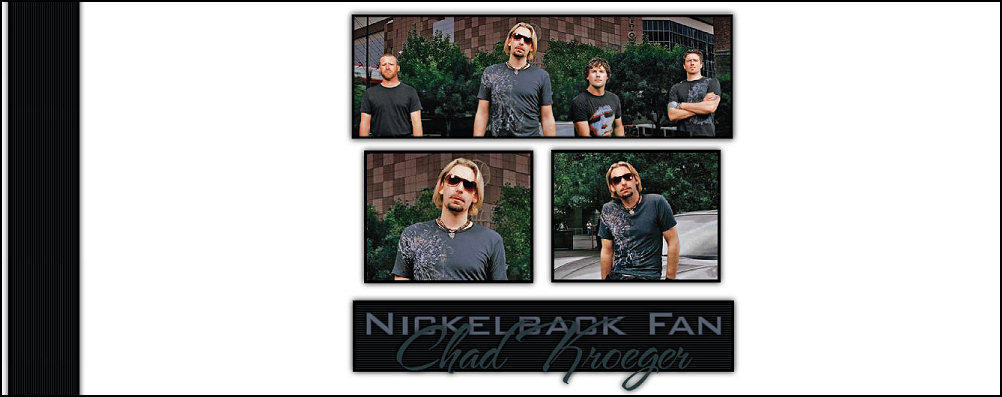

Supplies Needed:
 Paint Shop Pro (this was done using 9)
 My Supplies (Selections)
 3 Graphics of your choice
 Fonts of your choice
Please open zip file and install the selections in your PSP/Selections folder before opening up PSP...
**Please Note that all settings remain the same unless otherwise stated**
Let's Get Started:
1. Open your graphics in PSP. Decide which graphic you'd like to go in the first (Top Box), The Second (Left) Box, and the Third (Right) box.....
2. Open a new raster image 550x550 and flood fill white
3. Layers/New Raster Layer
4. Selections/Load-Save Selections/Load Selection From Disk and load the PictureBox1_JM Selection..
5. Flood Fill with Black and then go to
Effects/3D Effects/Drop Shadow with these settings:
H&V=0, Opacity=100, Blur=12, Color=Black
6. Selections/Modify/Contract by 4
7. Now make the graphic you'd like to use in this first box active and go to Edit/Copy (you can now close this graphic out)
8. Back to your main image and go to Edit/Paste/Paste as a new layer. You may have to resize so a portion of it will fit properly. You can do this by going to Image/Resize and resize it down to where you need to. Make sure Resize all layers is Not checked.
After you resize you may need to sharpen it also...
9. Once you have your graphic sized and it looks good to you go to Selections/Invert and then Edit/Clear
10. Selections/Select None
11. Layers/New Raster Layer
12. Selection/Load-Save Selection/Load Selection from disk and load the PictureBox2-LeftSide_JM Selection
13. Flood fill with black and then add a drop shadow (same settings we used previously)
H&V=0, Opacity=100, Blur=12,Color=Black
14. Selections/Modify/Contract by 4
15. Make your Second graphic active and go to Edit/Copy (you can now close this out)
16. Back to the main image and Edit/Paste/Paste as a new layer and position it over your second selected box. Again you may have to resize it and then sharpen..
17. When you have that sized to where it looks good to you go to Selections/Invert and then go to Edit/Clear
18. Selections/Select None
19. Layers/New Raster Layer
20. Selections/Load-Save Selections/Load Selection From Disk and load the PictureBox-RightSide_JM Selection
21. Flood fill with black and then add a drop shadow:
H&V=0, Opacity=100, Blur=12,Color=Black
22. Selections/Modify/Contract by 4
23. Make your third graphic active and go to Edit/Copy (you can now close this out)
24. Back to your main image and go to Edit/Paste/Paste as a new layer
25. Position it over your third selected box and resize and sharpen if necessary
26. Selections/Select None
27. Layers/New Raster Layer
28. Selections/Load-Save Selections/Load Selections From Disk and load the PictureBox-Text_JM Selection
29. Flood fill with black and then add a drop shadow:
H&V=0, Opacity=100, Blur=12,Color=Black
30. Selections/Modify/Contract by 4
31. Effects/Texture Effects/Blinds:
Width=3, Opacity=25 and Horizontal should be checked. For the color you can use #dedede which is a grayish color or you can click on a light to medium color from your graphic
32. Selections/Select None
33. Now we are going to use this text box we just created as a side border for our background too...So double check to make sure this text box is the active layer and then go to:
Edit/Copy and then Edit/Paste/Paste as a New Image
34. On this new image go to Image/Rotate/Free Rotate and make sure Left, 90, and All Layers is marked...
35. Effects/Image Effects/Seamless Tile and set it at Corner and Vertical with Transmission at 50
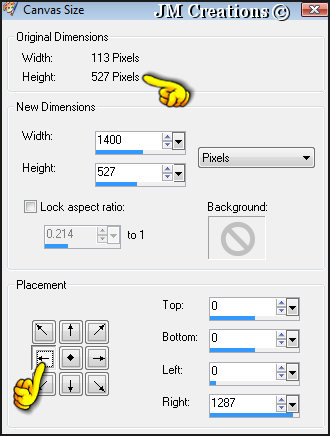
36. Image/Canvas Size and canvas it 1400x527 (Of course if your resolution is wider than 1400, you can make yours wider). Make sure the position is in the middle left when canvas sizing also:
37. Layers/New Raster Layer
38. Move this layer to the bottom and flood fill with white or whatever color you'd like to...
39. File/Export to JPEG Optimizer and optimize at 15 - 20 (or your preferred settings), name it and save....
(You can now close this out...This will be your background)
40. Back to your main image..
Using Fonts of your choice and colors from your graphic, you can add the text you'd like to.
41. If you are going with a white background for your stationery you can leave your header as it is. If you are choosing to go with a color for your background then you need to make the background layer the active layer (this is the white one)..and Flood fill it with the color you used for your background image.
42. When you are done with your background color choice go to Layers/Merge/Merge All Visible
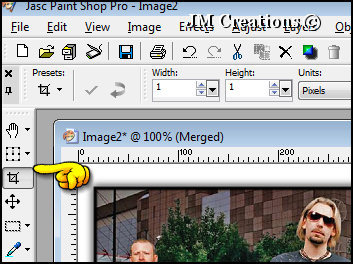
43. Now click on your crop tool:
44. Crop around your graphic..Make sure not to get to close to cut off the drop shadow though...
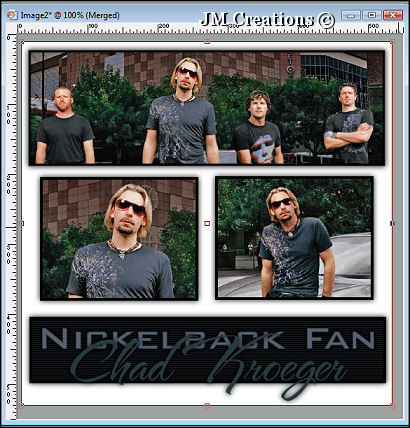
45. When you have it cropped where you are happy with it, either double click in the middle of it or hit the check mark in the upper left hand corner of PSP
46. Add any accent tubes or brushes that you'd like and also your watermark...
47. When you are done, Export it to the JPEG Optimizer and Optimize at 15 - 20 or wherever works best for your graphic..Save it and you are done!!
Please make sure to credit the tutorial back to JodiM at:
Please feel free to snag and share my tutorials after they have been released but please credit back to me in the footer..
If you are a tutorial writer and you would like to use my selections, masks, or other things please email me at jodim@norwaymi.com
I do allow it, but I require a link back in your tutorial to my website here:
Jodi M
