Creatively Framed N Chained Stationery Tutorial
Creatively Framed N Chained Stationery Tutorial


Things Needed:
 Paint Shop Pro (This was done using 9)
 Supplies (Which includes Chain tubes and silver or gold patterns)
 DC Special (Book) Plugin Found Here
 Graphic of your choosing (Must be square in shape and at least 390 pixels in width and height)
 Font of your choice
**There are 2 tubes and 2 patterns included in the Supplies zip. A silver and a gold of each. You will only be needing whichever one you choose to use (either silver or gold) Choose one of these patterns to put into your PSP/Patterns folder...Or you can put them both in if you don't have them**
**Make sure you put the DC Special Plugin into your PSP/Plugins folder before opening Paint Shop Pro too**
Please Note..All Settings remain the same unless otherwise noted
Let's Get Started!
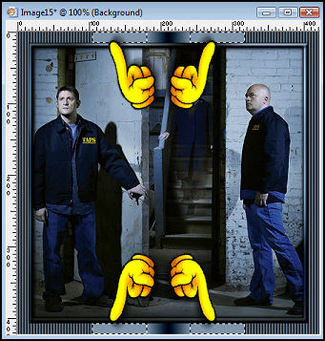
1. Open your graphic of choice and one of the chain tubes in PSP. Your graphic needs to be square in shape which means it must have the same dimensions for the width and height. If it does not, you can either crop it out so it does, and use custom resize to get it square, or use my optional instructions below..
We need to have the size of this graphic be 390x390 so another option if you are having problems resizing is to open a new raster image 390x390. Go to Edit/Copy on your graphic(You can close it out then). Back to the new raster image and go to Edit/Paste/Paste as a new layer and resize it down to where it fits in this new raster image nicely. Make sure you do not have Resize All Layers Checked when resizing. Use Smart resize also...and you will need to go to Adjust/Sharpness/Sharpen when you are done resizing....
Whichever method you used to get your graphic sized 390x390, now go to Layers/Merge/Merge All Flatten..
2. Edit/Copy your graphic and then Edit/Paste/Paste as a new Image and you can minimize this copy. We are doing this step incase it isn't in your clipboard later just to be safe :)
3. Using your dropper tool....select a Medium color from your graphic, nothing really light or dark. We found when doing this a few times, the lighter or darker the color the plug-in didn't look right. So a nice Medium color will work best...
4. Open a new raster image 100x100 and flood fill with the medium color you chose. You can place this new image in the left hand top corner in PSP to use to click on when we add a border in this color. We will also be using this image to make your background at the end of the tutorial...
5. Back to your image, go to Selections/Select All and then Selections/Modify/Contract by 6
6. Effects/3D Effects/Cutout.....V & H...2, Opacity...90, Blur...5, Shadow Color Black, Fill interior with color not checked.
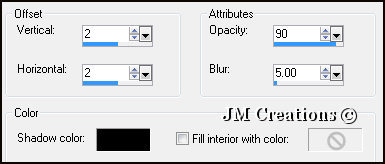
Repeat cutout...but change V & H to -2....
7. Selections/Invert
8. Adjust/Blur/Gaussian Blur at 20
9. Effects/3D Effects/Inner Bevel:
Bevel 2, Width 10, Smoothness 0,
Depth 5, Ambience 0, Shininess 0, Color White, Angle 315, Intensity 50, Elevation 20
10. Selections/Select None
11. Image/Add Borders.....Add a Symmetric 1 pixel border in Black
12. Image/Add Borders.....Add a Symmetric 15 pixel border using your chosen "medium" color
13. With your Magic Wand, select your border
Wand Settings: Replace, RGB Value, Tolerance=0, Sample Merged and Contiguous both checked, Feather=0, Anti-Alias not checked
14. Effects/Plugins/DC Special/ Book....Settings: 20 and 255
15. Selections/Select None
16. Using your Magic Wand, select the Plain boxes on each side....top and bottom
17. Effects/Texture Effects/Blinds:
Width=2, Opacity=30, Color=Black, Horizontal and Light From Left/Top boxes both checked
18. Selections/Select None
19. Image/Add Borders and Add a Symmetric 1 pixel border in Black
20. Image/Add Borders.....Add a Symmetric 6 pixel border in White
21. With your Magic Wand, Select your white border
22. Edit/Paste/Paste into
Selection
23. Adjust/Blur/Gaussian Blur at 20
24. Effects/3D Effects/Inner Bevel
25. Selections/Select None
26. Image/Add Borders and Add a Symmetric 1 pixel border in Black
27. Image/Add Borders and Add a Symmetric 25 pixel border using your chosen "medium" color.
28. With your Magic Wand, select your border
29. Effects/Plug-ins/DC Special Book....Settings: 20 and 255
30. Selections/Select None
31. Using your Magic Wand, select the Plain boxes on each side....top and bottom
32. Effects/Texture Effects/Blinds
33. Selections/Select None
34. Image/Add Borders and Add a Symmetric 1 pixel border in Black
35. Image/Add Borders and Add a Symmetric 6 pixel border in White
36. With your Magic Wand, select your white border
37. Edit/Paste/Paste into Selection
38. Adjust/Blur/Gaussian Blur at 20
39. Effects/3D Effects/Inner Bevel
40. Selections/Select None
41. Image/Add Borders and Add a Symmetric 1 pixel border in Black
**Wow, now the frame is done. Your total image with frame should be 504 X 504 pixels**
42. Now we are ready to add the Chain so make the chain the active image and to to Edit/Copy and then back to your image and Edit/Paste/Paste as a new layer (You can close the chain out now too)
43. This next step is optional, but we liked it so our text would show up. You can do this by closing out your bottom layer but have your chain tube layer the active one
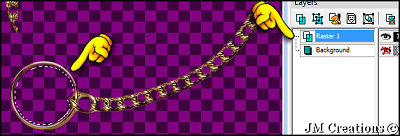
Click with your magic wand inside the chain loop.
Next go to Selections/Modify/Expand by 3.
Add a new Raster Layer and move it below the Chain layer and Flood Fill it with your chosen color. Add the blinds setting.
When you are done with this, select none and make your background layer visible again..
44. Make sure your chain layer is the active layer and go to Effects/3D Effects/Drop Shadow:
V&H=1, Opacity=50, Blur=3, Black
(You can put text inside the chain loop if you would like to using the font of your choice. You can also apply a drop shadow of your choice to the text or use the one we previously used)
V&H=1, Opacity=50, Blur=3, Black
45. Add your watermark, merge the layers, export to the JPEG Optimizer and optimize at 15-20 or what works best for your image...
That's it....done with the header.
Now for the Background/Sideborder
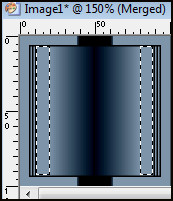
46. Make your chosen color 100x100 image the active image
47. Effects/Plugins/DC Special/Book plugin at settings: 255 and 84
There will be white spaces around it..but don't panic, there are supposed to be!! lol
48. Select the two outer white spots with your magic wand (You will have to hold down the "Shift" button to select them both) and flood fill with your chosen color
49. Now with your magic wand, select the 2 inner white spots (Top and bottom) and flood fill with black..
50. Image/Canvas Size 1400x100
Make sure placement is left middle arrow...
51. Effects/3D Effects Drop Shadow with the following settings:
V&H=0, Opacity=100, Blur=12, Color=Black, Shadow on new layer checked
52. Effects/Image Effects/Seamless Tiling and make sure Corner and vertical are checked. Transition should be at 50
53. Layers/Merge/Merge Visible
54. Layers/Add New Raster Layer and flood fill with your chosen color
55. Layers/Arrange/Move to bottom
56. On this bottom layer go to Effects/Texture Effects/Blinds and use the settings previously used, but uncheck "Horizontal"
57. Layers/Merge/Merge Visible
58. Select the side boxes and flood fill them with Gold or Silver. While they are still selected, add the Book plugin again at 19 and 255
That's it, Send your image to the JPEG Optimizer and optimize at the same settings as your header or whatever you want to use and assemble parts in Letter Creator.
**A good left margin setting for your text is around 115**
Please link tutorial back to Jodi M and ZiggyFan at:
We would like to thank you for trying our tutorial and we hope you enjoyed it :)
Thank you to our testers at CCC Testers!
You can find this tutorial (upon release) at ZiggyFan's website here:
And Jodi M's website here:
If you are a tutorial writer and you would like to use our selections, masks, or other things that we create ourselves to use for our tutorials please email use at either jodim@norwaymi.com or ziggyfan@sbcglobal.net first to ask our permission.
We do allow it, but only for those that ask permission!
Thanks!!
ZiggyFan/Amy & Jodi M