Circle of Attention Stationery Tutorial
Circle of Attention Stationery Tutorial

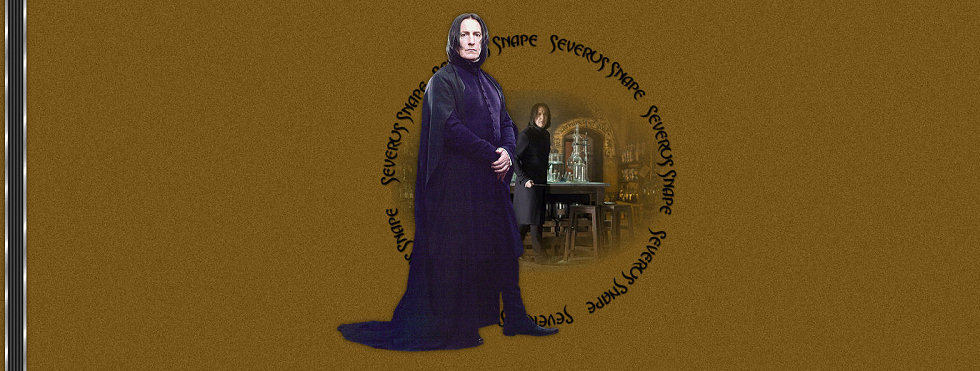
Things Needed:
**Paint Shop Pro (this was done using 9)
**My Vector Circle tube
**20-20 Mask
**Silver or Gold Pattern (Optional)
**Graphic and tube or tubes of your choice
Your graphic should be at least 500 pixels wide and 350 pixels in height. We will be resizing it in steps 2 through 4 but anything smaller than 500x350 will not work best.
****Supplies Found Here**** Includes the Mask, Silver and Gold Patterns, and Vector Circle Tube
Before Beginning, make sure you have placed your Gold and/or Silver Pattern in your PSP/Patterns folder
Let's get started....
1. Open the Vector Circle tube, Mask, your graphic, and your tube/tubes of choice in PSP. You can minimize all except for your graphic....
2. Open a new raster image 428x285.
Make sure Transparent is marked...
3. Now open your graphic and go to Edit/Copy (you can either minimize your graphic or close it out. We won't be needing it again)
4. Back to your new raster image and go to Edit/Paste/Paste as a new layer.
Using your mover tool, you may need to position your graphic. If it looks to large to fit, please resize by going to Image/resize and resize it to where it looks more proportioned. Do not have Resize all layers checked. If you resized, you will also need to sharpen your graphic by going to Adjust/Sharpness/Sharpen
5. Open a new raster image 100x100
We are going to fill this with a medium color from your graphic.
6. Using your eye dropper tool, left click on your graphic and choose a medium color or one that you think will work best for your stationery background...
7. Now using your flood fill tool, flood fill the 100x100 new raster image we just created and position it somewhere on the top of your workspace in Paint Shop Pro. I like to do this incase I lose the color I have chosen somewhere during the course of creating!
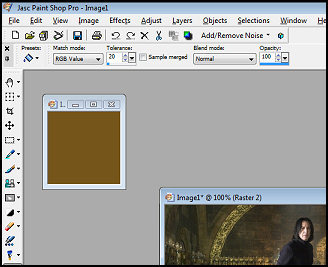
8. Back to your image and go to Layers/Merge/Merge Visible
9. Layers/New Mask Layer from image and choose the 20-20 Mask
10. Layers/Merge/Merge Group
11. Image/Canvas Size and make it 500x500 pixels and placement is in the center
12. Layers/New Raster Layer. Move this layer to the bottom
13. Using your flood fill tool, flood fill with the color you have chosen
14. Still on your background layer go to Adjust/Add Remove Noise/Add Noise using Gaussion at 10 and make sure Monochrome is checked
15. Effects/Image Effects/Seamless Tiling and tile at default
If your graphic seems to light or muted from the mask and you would like it a little darker, you can duplicate your graphic layer to see if it looks better. This of course is optional, but sometimes the mask does mute to much in certain parts of your image....
16. Maximize the Vector Circle Tube and go to Edit/Copy (you can now close this out)
17. Back to your image and go to Edit/Paste/Paste as a new layer
18. Layers/Add New Raster Layer
19. Using your text tool, Position it on the circle (Right on the line of the circle so your text tool shows a curvature mark) and begin typing what you would like it to read around your graphic. You will have to type the same thing over and over and leaving a few spaces in between so it will look proportioned..
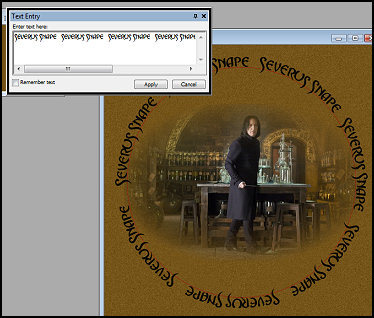
What I have done is I typed "Severus Snape" and then left 4 spaces in between and typed "Severus Snape" again and just repeated until the circle looked full. You may need to adjust more or less spaces in between words...a little tweaking is usually required though...lol
You can choose the font you would like to use and also if you would like to use a solid color or a silver or gold pattern for your text (just set your preferences in the layer palette)
20. When you are done tweaking your text and you have it to where you think it looks good, Click Apply...
21. Layers/Convert to Raster Layer
22. Effects/3D Effects/Drop Shadow with the following settings:
V&H=1, Opacity=50, Blur=2, Color=Black
23. Now in your layer palette, delete your Vector layer. Just highlight the Vector layer and then right click and choose delete. If you are prompted to whether you want to delete this layer, just click yes....
24. Now close out your bottom layer by clicking on the eye, make sure your top layer is the highlighted or active layer and go to Layers/Merge/Merge Visible
25. Image/Resize and resize your graphic/merged layer 90% (Make sure Resize all layers is Not checked)
26. Adjust/Sharpness/Sharpen
27. Open your Background Layer again
28. Now you get to add your tube or tubes of choice. You can use your mover tool to move your merged layer if you need to...
If you resize your tube to fit, make sure you sharpen it after. You can also add a drop shadow with the following settings or one of your own:
V&H=0, Opacity=50, Blur=10, Color=Black
29. Add your watermark and go to Layers/Merge/Merge Visible....
30. Now go to File/Export to JPEG Optimizer and optimize at 15. Anything higher than 15 is going to distort it and not make it blend with your background very well. I have tried different settings, and 15 is what I found to work the best....
If you plan on making a tag out of this later, you can just minimize it for now...Otherwise you can close it out...
Now we are going to make the background!
1. Open a new raster image 30x300
2. For the side border, you will need to choose 2 colors that are different from the background color you have chosen...
If you used silver or gold for your text, this is another place where you should use it.....Usually even if I haven't used Silver or Gold in my Text though, I like to use it here. The choice is yours though, but the first layer we are going to flood fill will be the border band color for the side border. This is why I like to use Silver or Gold so it dresses it up a bit and stands out..
So please flood fill your new image with the color or pattern of your choice
3. After you have flood filled your first color, go to Selections/Select All and then Modify/Contract and contract by 4
4. Layers/New Raster Layer and flood fill with either black or another color of your choice
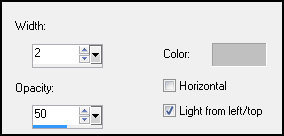
5. While it's still selected, go to Effects/Texture Effects/Blinds and use the settings below. I am using Black as my second color so for the blinds color I am using a gray color #c0c0c0
You will have to adjust this if you use a different color...You will need to use one that works best for the color you have chosen.....
6. Selections/Select None
7. Layers/Merge/Merge Visible
8. Effects/Image Effects/Seamless Tiliing and tile using Corner and Vertical
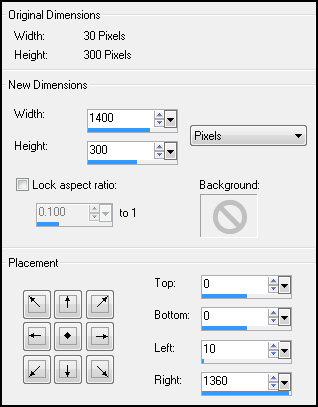
9. Image/Canvas Size and canvas it 1400 (or whatever your resolution width is) by 300 height
For placement, click on the left middle arrow and then over on the right, adjust the left margin to 10. You do not need to do anything else to the other margins....It will self adjust
10. Effects/Image Effects/Drop Shadow and use the same settings I gave for the tubes which is V&H=0, Opacity=50, Blur=10, Color=Black
11. Effects/Image Effects/Seamless Tiling using Corner and Vertical
12. Layers/Add New Raster Layer
13. Flood Fill this new layer with the color you have saved in the little 100x100 box on your workspace (This is the same color you used for the background of your header)
14. Move this layer to the bottom and go to Adjust/Add Remove Noise/Add Noise at the same settings we used before...
Now it's time to Optimize it so go to File/Export to JPEG Optimizer and Optimize it at 20, Save it, and you are done!!!
Assemble it in Letter Creator and Add link back to me at http://www.jmcreationtuts.iwarp.com
Please feel free to snag and share my tutorials after they have been released but please credit back to me in the footer..
If you are a tutorial writer and you would like to use my selections, masks, or other things please email me at jodim@norwaymi.com
I do allow it, but I require a link back in your tutorial to my website here:
Thanks to all of my testers at CCC Testers and also to all the wonderful members of my groups!
And to those of you who enjoy my tutorials I thank you from the bottom of my heart
Jodi M