Side Border Series Tutorial 7
Side Border Series Tutorial 7


Things Needed:
**Paint Shop Pro (This was done using v.9)
**Graphic of your choice (Must be wider than it is tall)
The size of the graphic should be at least 400x350 for best results. Larger graphics used in testing turned out with the best results. The graphic I used was 672x495
**Simple - Quick Tile Plugin
**Silver or Gold Pattern or Beads
**2Proud Mask
Supplies Found Here
Please note...All settings remain the same unless otherwise stated. Before opening Paint Shop Pro, make sure you have your Simple Filter installed into your Plugins folder, The Silver/and or Gold Pattern installed into your Patterns Folder, and the mask into your Mask Folder in PSP...
Let's Get Started!!
1. Open your graphic in Paint Shop Pro. Duplicate once and close out the original
2. Open a new raster image 100x100 pixels and flood fill it with a lighter color from your graphic and set this color as your foreground color in your color palette. Then open a second 100x100 raster image and flood fill it with a medium to darker color from your graphic and set this color as your background color in your color palette. Set these two images up in your top left corner of your work space. We are saving your 2 color choices just incase they should disappear from your color palette. They may not be needed, but they are there just incase!! Believe me it's better to be safe than sorry...lol
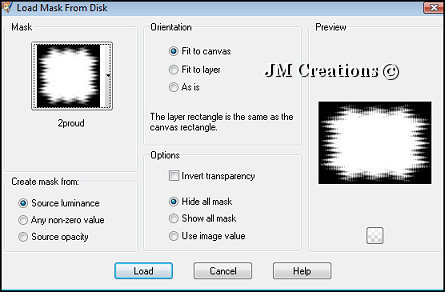
3. Back to your main image. Go to Layers/Load Save Mask/Load Mask From Disk and choose the 2Proud mask
4. Layers/Merge/Merge Group
5. Layers/Add New Raster Layer
6. Layers/Arrange/Send To Bottom and flood fill with your dark color
7. Close off the visibility of your top layer by clicking the eye
8. Back to your bottom layer. Make sure this is the highlighted/active layer and go to Layers/Add New Raster Layer
9. Flood fill this new layer with your lighter color
10. Layers/Load Save Mask/Load Mask From Disk and again choose the 2 Proud mask with all the same settings except make sure the "Invert" box is checked....
11. Layers/Merge/Merge Group
12. Layers/Merge/Merge Visible
13. Effects/Plugins/Simple/Quick Tile
14. Edit/Copy and then Edit/Paste/Paste as a New Image and set this aside or minimize for now. We are going to use this for your background....
15. Back to your main image and open up your top layer's visibility again and make sure it is the active/highlighted layer
16. Image/Resize and Resize it 85% Using Smart Size and make sure Resize All Layers is Not Checked....
17. Adjust/Sharpness/Sharpen
18. Layers/Merge/Merge Visible
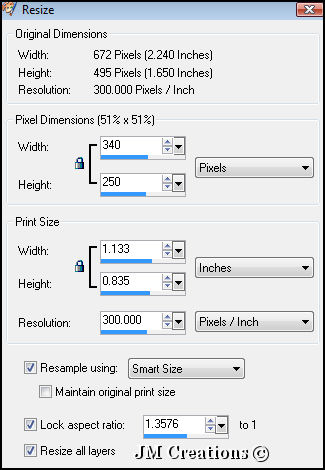
19. Image/Resize and make it 340 Pixels wide. The height will self adjust with Lock Aspect Ratio checked. Also make sure Resize all layers is checked
20. Adjust/Sharpness/Sharpen
21. Image/Canvas Size and make it 344 pixels wide and the height of your graphic stays the same. Placement is in the middle..If you are unsure what the height of your graphic is, look at the top of the Canvas size box...It will give you the dimensions of your graphic's width and height....
22. Layers/New Raster Layer. Move this layer to the bottom and flood fill with either your Silver or Gold Pattern or Beads....The results from my testers were awesome with either the Patterns or the Beads :)
23. Effects/Image Effects/Seamless Tile and make sure the settings are on Corner and Vertical
24. Layers/Merge/Merge Visible
25. Image/Cavas Size and make it 1400 Wide (or whatever you use for your resolution). Height stays the same as your graphic and placement is middle left arrow....
26. Effects/3D Effects/Drop Shadow using the following Settings:
V&H=0, Opacity=100, Blur=12, Color=Black and make sure Shadow on New Layer is checked
27. Effects/Image Effects/Seamless Tiling using the same settings
28. Layers/Merge/Merge Visible
29. Layers/New Raster Layer and move this layer to the bottom
30. Now bring up that image with the color we copied from your main one earlier. Image/Resize and resize it just like we did before. 340 pixels wide and height will self adjust
31. Adjust/Sharpness/Sharpen
32. Now over in your color palette, find this pattern in the patterns section. The angle should be set to 0 and the scale should be at 100
33. Back to your main image and flood fill the new bottom layer with this pattern
34. Layers/New Raster Layer and flood fill with your darker color. Reduce the opacity to 70 or whatever works best for you...In the tests I've done myself, I've found 70 to be a really good setting.
35. Layers/Merge/Merge All/Flatten
36. Now you can add your watermark and any text if you'd like.
37. For saving go to File/Export and Export to the JPEG Optimizer and Optimize at 15
38. Arrange in the Body Section of Letter Creator. A little tip too is that a good left margin setting for your text is 365-370 :)
Please link tutorial back to me at http://www.jmcreationtuts.iwarp.com
Please feel free to snag and share my tutorials after they have been released but please credit back to me in the footer..
If you are a tutorial writer and you would like to use my selections, masks, or other things please email me at jodim@norwaymi.com
I do allow it, but I require a link back in your tutorial to my website here:
Thanks to my testers at CCC Testers too...You guys are the best!!
Thanks!!
Jodi M