Hatch Fine Mess Stationery Tutorial
Hatch Fine Mess Stationery Tutorial
Download Tutorial Here
Download Supplies at the links below.....


Things Needed:
** Paint Shop Pro (This was done using V.9)
**Graphic of your choice
(Must be at least 400 pixels wide & one that is similar in width and height size will work best)
** Silver or Gold Beads Pattern Found Here
(Please install the beads into your Patterns folder in PSP before starting)
** We will be using the Hatch Fine texture in PSP 9. If you do not have this, you can download it Here
(Please place this in your Textures folder in PSP before starting)
Let's Get Started!
1. Open graphic in Paint Shop Pro. Edit/Copy and Edit/Paste/Paste as a New Image (You can close out original)
2. Your graphic should be a little wider than it is tall but
we now need your graphic to be 400 pixels wide, so to to:
Image/Resize and resize using Pixels and Smart Size. Make sure Lock Aspect Ratio is checked so
your Height will self adjust. Resize all layers should be checked also.
3. Adjust/Sharpness/Sharpen
4. Edit/Copy and then Edit/Paste/Paste as a New Image (You can minimize one copy incase you lose it from
your clipboard)
5. Open a new transparent raster image 100x100. Choose a medium to darker color from your
graphic using your eye dropper. You can left click on this color to set it as your foreground color
in your layer palette. This color is going to be your stationery background color so choose one
that goes well with your graphic.
After you have chosen your color, flood fill new image with it and set the new raster image
off to the side in your workspace. We are saving your chosen color incase it should disappear
from your color palette later :) It's handy to place it in the top left corner of your workspace so you
can click on it to set it as the chosen color for your border in the steps we will be doing that in....
In your color palette, you can set your background to your beads pattern Angle=0, Scale=100...
6. Back to your main image and go to:
Image/Add Borders and add a 2 pixel white border (or a color not in your graphic)
Throughout this tutorial, please make sure "Symetric" is checked for all borders too....
Throughout this tutorial, please make sure "Symetric" is checked for all borders too....
7. Select this new border with your magic wand and flood fill with your beads pattern -
And then Selections/Select None
Magic Wand Settings:

8. Image/Add Borders and Add a 15 pixel border using your foreground color
9. Select new border with your magic wand and Edit/Paste/Paste Into Selection (Do not de-select)
10. Effects/Distortion Effects/Wind and From Left at 100 strenth should be the settings
11. Repeat this Wind Setting but change Wind Direction to "From Right"
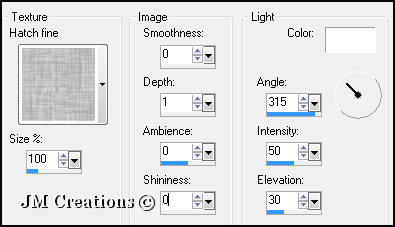
12. Effects/Texture Effects/Texture and choose the Hatch Fine from the pull down box with the
following settings - And Select None

13. Image/Add Borders and add a 2 pixel white border
14. Select with your magic wand and flood fill with your beads patter - And Select None
15. Image/Add Borders and add a 25 pixel border in your foreground color
16. Select new border with your magic wand
17. Edit/Paste/Paste Into Selection
18. Effects/Distortion Effects/Wind - From Left at 100 Strength
19. Effects/Distortion Effects/Wind - From Right at 100 Strength
20. Effects/Texture Effects/Texture and choose Hatch Fine with the same settings
21. Image/Mirror - and Select None
22. Image/Add Borders and add a 2 pixel border in white
23. Select new border with magic wand and flood fill with beads pattern - And Select None
24. Image/Add Borders and add a 35 pixel border in your foreground color
25. Select new border with your magic wand and Edit/Paste/Paste into Selection
26. Effects/Distortion Effects/Wind - From Left at 100 Strenth
27. Effects/Distortion Effects/Wind - From Right at 100 Strengh
28. Effects/Texture Effects/Texture and choose Hatch Fine with the same settings
29. Image/Flip - And Select None
30. Image/Add Borders and add a 2 pixel border in white
31. Select new border with your magic wand and flood fill with your beads - And Select None
32. Add your watermark and then File/Export/Export to JPEG Optimizer and Optimize at anywhere
between 15 - 20. Do not close this out, we still need it to make your background.....
Background:
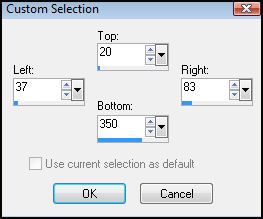
1. Now we are going to click on the Selection Tool/Custom Selection with the following
Settings:

2. Edit/Copy and then Edit/Paste/Paste as a new image ( you can now either minimize your header
or close it out, we don't need it anymore)
3. Effects/Image Effects/Seamless Tiling using Corner and Vertical
4. Image/Canvas Size and make it 1400 x 330
5. Effects/3D Effects/Drop Shadow with the following Settings:
V&H=3, Opacity=65, Blur=8, Shadow on new layer is checked, Color=Black
6. Seamless Tile using the same settings
7. Layers/Merge/Merge Visible
8. Layers/New Raster Layer and move this new layer to the bottom
9. Flood fill this layer with your foreground color
10. Effects/Texture Effects/Texture and use the Hatch Fine with the same settings as we used
previously
11. Layers/Merge/Merge All
12. You are now done, so export this to the JPEG Optimizer using the same settings as
I previously suggested...
Arrange in Letter Creator and please link tutorial back to me at
http://www.jmcreationtuts.iwarp.com
Please feel free to snag and share my tutorials after they have been released but please credit back to me in the footer..
If you are a tutorial writer and you would like to use my selections, masks, or other things please email me at
jodim@norwaymi.com
I do allow it, but I require a link back in your tutorial to my website here:
http://www.jmcreationtuts.iwarp.com
Thanks!!
Jodi M
or close it out, we don't need it anymore)
3. Effects/Image Effects/Seamless Tiling using Corner and Vertical
4. Image/Canvas Size and make it 1400 x 330
...Placement is Left Middle...
(If your screen resolution is larger than 1400, you can make this number larger to accomodate your needs)
(If your screen resolution is larger than 1400, you can make this number larger to accomodate your needs)
5. Effects/3D Effects/Drop Shadow with the following Settings:
V&H=3, Opacity=65, Blur=8, Shadow on new layer is checked, Color=Black
6. Seamless Tile using the same settings
7. Layers/Merge/Merge Visible
8. Layers/New Raster Layer and move this new layer to the bottom
9. Flood fill this layer with your foreground color
10. Effects/Texture Effects/Texture and use the Hatch Fine with the same settings as we used
previously
11. Layers/Merge/Merge All
12. You are now done, so export this to the JPEG Optimizer using the same settings as
I previously suggested...
Arrange in Letter Creator and please link tutorial back to me at
http://www.jmcreationtuts.iwarp.com
Please feel free to snag and share my tutorials after they have been released but please credit back to me in the footer..
If you are a tutorial writer and you would like to use my selections, masks, or other things please email me at
jodim@norwaymi.com
I do allow it, but I require a link back in your tutorial to my website here:
http://www.jmcreationtuts.iwarp.com
Thanks!!
Jodi M