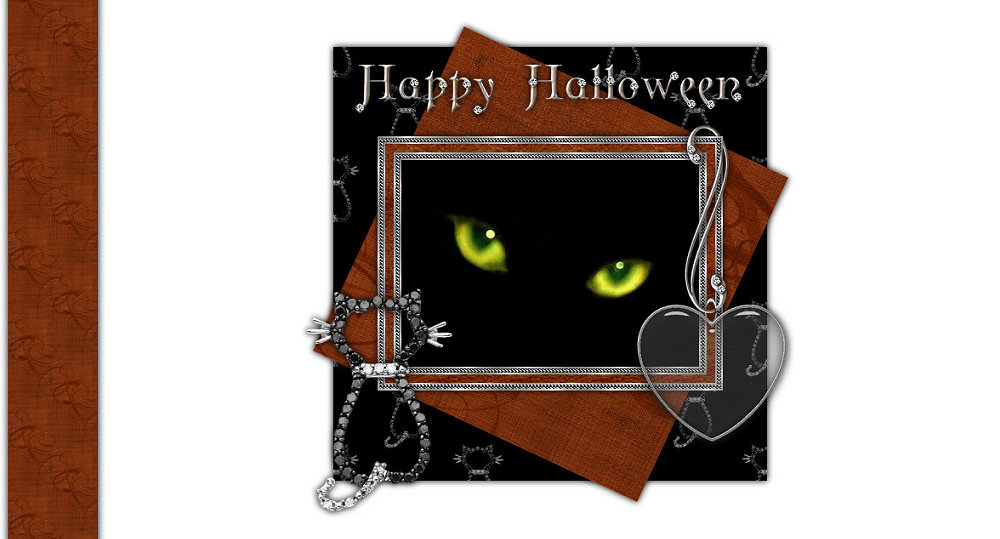
Happy Halloween Scrap Tutorial
Happy Halloween Scrap Tutorial
Download Tutorial Here and Download Supplies at the links below....


Things Needed:
**Psp (this was done using version 9 but should work in other versions)
**Graphic of your choice (Please Choose one that is wider rather than taller)
**If you are an experienced creator, you can use a tube/tubes rather than a graphic to achieve the same overall results. In testing, I had a few people use tubes on either a solid background or on one of the papers for the background**
**Filters Unlimited 2 Found Here
**Scrap Kit of your Choice or Mine found Here (Free To Use But Please Read My Terms of Use)
**Silver Pattern and Silver Beads of your choice or you can get them Here
~Please note that all settings remain the same unless otherwise stated~
~Before Opening Paint Shop Pro, make sure you have installed the Plugin if you don't already have it installed. Also unzip the Silver Pattern and Beads and put them in your PSP/Patterns folder~
The Header:
1. Open your graphic in PSP. Duplicate once (Shift + D) and close out original.
Also choose 2 papers from the Scrap Kit to use and any Elements/Extras you would like to use...You can minimize the papers and other things except for your graphic...
**You can change the colors of the papers to match your graphic if you'd like. You do this by going to Adjust/Hue and Saturation/Colorize. Please note that you won't be able to change the black papers though**
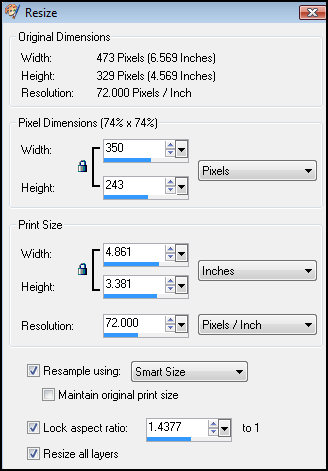
2. Make your graphic the active image and if it is larger than 350 pixels wide, it will have to be resized by going to Image/Resize and Make it no wider than 350 pixels wide. Make sure Resize All Layers and Lock Aspect Ratio are checked. Also resize using Smart Size:

3. If you have resized you may need to go to Adjust/Sharpness/Sharpen
4. Set your Foreground to the Silver Beads and the Background to the Silver Pattern
5. Image/Add Borders and Add a 2 pixel white border or a color not in your graphic..
6. Select the 2 pixel border with your magic wand with the following settings:

7. Click on your Flood Fill Tool and Right Click to fill with the Silver Pattern. Flood Fill Settings are:
Match Mode=None, Blend Mode=Normal, Opacity=100
8. Selections/Select None
9. Image/Add Borders and add a 5 pixel border with white or a color not in your graphic
10. Flood Fill by Left Clicking to fill with the Silver Beads
11. Selections/Select None
12. Image/Add Borders and add a 2 pixel border in white or a color not in your graphic
13. Flood Fill by Right clicking to fill with your Silver Pattern
14. Selections/Select None
15. Image/Add Borders and add a 10 pixel border with a color from your graphic or the color I have used to match the papers: #7e3309
16. Select this new border with your magic wand and go to Effects/Plugins/Filters Unlimited 2/Paper Textures/Fibrous Paper, Coarse and use the default settings that are there
17. Selections/Select None
18. Image/Add Borders and add a 2 pixel white border
19. Select with Magic Wand and flood fill with your Silver Pattern and Select None
20. Image/Add Borders and add a 5 pixel border in white or a color not in your graphic
21. Select with Magic Wand and Flood Fill with the Silver Beads and Select None
22. Image/Add Borders and add a 2 pixel border in white or a color not in your graphic and flood fill with the Silver Pattern....And Select None
23. Set this image aside for right now, we will need it in a minute :)
24. Open a new Raster Image 600x600 and Flood Fill with White
25. Bring up the 2 papers you would like to use and on one of them go to Edit/Copy (You can now minimize this one)
26. Back to your new raster image and go to Edit/Paste/Paste as a new layer
27. Image/Resize and resize this 85%. Make sure "Resize All Layers" is Not checked
28. Adjust/Sharpness/Sharpen
29. Effects/3D Effects/Drop Shadow with the following settings:
V&H=0, Opacity=100, Blur=12, Color=Black
30. Bring up the second paper you would
like to use and go to Edit/Copy (you can now minimize this)
31. Back to your new raster image and go to Edit/Paste/Paste as a new layer
32. Image/Resize and Resize it 70%
33. Image/Rotate/Free Rotate and move it Right 25 Degrees....
34. Adjust/Sharpness/Sharpen
35. Effects/3D Effects/Drop Shadow
36. Make your Framed Image the Active Image and go to Edit/Copy (You can now minimize this)
37. Back to your new Raster Image and go to Edit/Paste/Paste as a new layer
38. Effects/3D Effects/Drop Shadow
39. Now you get to play and have fun adding elements and any extra tubes that you would like. Remember to add a drop shadow to all of them too....When you are done, make sure to also add your watermark
~This Tutorial is meant for your stationery background to be white. If you would prefer a color, highlight the bottom background layer and go to Edit/Clear. Then Flood Fill with the color you would like. You will also have to use this same color to flood fill your background layer in step 10 below~
40. When you are all done, go to Layers/Merge/Merge Visible
~Optional...If you are familiar with using the crop tool, you can crop off any excess white (or color) from the sides of your image. Make sure not to get too close to your image though~
41. File/Export and Export to the JPEG Optimizer and Optimize at 15 or whatever your preference is...
The Background:
1. Bring up one of the papers that you minimized earlier. Choose one that will look good as the sideborder strip for your background...
2. Image/Resize and resize 15%
Make sure "Resize All Layers Is Checked..
3. Adjust/Sharpness/Sharpen
4. Effects/Image Effects/Seamless Tiling and tile at Default and then go to Layers/Promote Background Layer
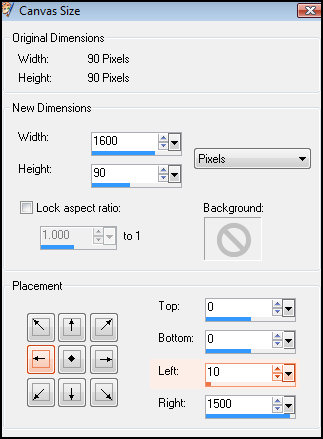
5. Image/Canvas Size and make it 1600x90 (If your screen resolution is greater than 1600, please adjust to suit your needs). Placement is Left Middle and then on the right where it says "Left", change this to 10:

6. Effects/3D Effects/Drop Shadow with the following settings:
V&H=0, Opacity=100, Blur=12, Color=Black, Shadow on new layer is checked
7. Effects/Image Effects/Seamless Tiling and tile using Corner and Vertical. Vertical Offset=0, Transition=50
8. Layers/Merge/Merge Visible
9. Layers/New Raster Layer
10. Layers/Arrange/Send To Bottom and Flood Fill with White (Or the same color you chose for your header background)
11. Layers/Merge/Merge Visible
12. File/Export to the JPEG Optimizer and Optimize at 15 or whatever your preference is....
Arrange in Letter Creator and you are done!!
Thanks so much for trying my tutorial. I hope your results were great ones :)
Please feel free to snag and share my tutorials after they have been released but please credit back to me in the footer..
If you are a tutorial writer and you would like to use my selections, masks, or other things please email me at
jodim@norwaymi.com
I do allow it, but I require a link back in your tutorial to my website here:
http://www.jmcreationtuts.iwarp.com

Another Example