Beaded Elegance Stationery Tutorial
Beaded Elegance Stationery Tutorial


Things Needed:
**Paint Shop Pro (This was done using Version 9)
**A Graphic of your choice (one that is wider rather than tall will work best. It also needs to be at least 450 pixels wide)
**Gold Beads Pattern (Found in my Supplies Zip)
**A Graphic of your choice (one that is wider rather than tall will work best. It also needs to be at least 450 pixels wide)
**Gold Beads Pattern (Found in my Supplies Zip)
**My Gold Beads Button (Found in my Supplies Zip)
~Please note that all settings remain the same unless otherwise stated~
~Before Opening up PSP, Please put the Gold Beads Pattern in your PSP/Patterns folder~
The Header
1. Open your graphic in PSP. Duplicate (Shift + D) once and close out original. Also open up the Gold Beads Button from the Supplies Zip and minimize til later...
2. Your graphic needs to be 450 pixels wide. If it is larger please resize by
going to Image/Resize and set the width to 450. Resize using Smart Size, Make sure Lock Aspect Ratio, and Resize all layers is checked.
3. If you have resized, you may want to sharpen by going to Adjust/Sharpness/Sharpen
4. Edit/Copy and then Edit/Paste and Paste as a new image. You can minimize one copy
~If your graphic disappears from your clipboard at any point, please bring it back up and copy it again~
5. Make your graphic the active image and go to Image/Add Borders and add a 1 pixel symmetric border in black..
6. Image/Add Borders and add a 20 pixel border in white
7. Select the white border with your magic wand.
Wand settings are:
Mode=Replace, Match Mode=RGB Value, Tolerance=0, Contiguous is checked, Feather=0, Anti-Alias is Not checked
8. Edit/Paste and then Paste/Into Selection
9. Effects/Texture Effects/Blinds with the following settings:
Width=3, Opacity=40, Color=Black, Horizontal and Light from left/top are both checked...
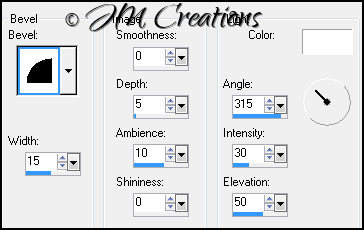
10. Effects/3D Effects/Inner Bevel with the following settings:
Bevel#2, Width=15, Smoothness=0, Depth=5, Ambience=10, Shininess=0,
Color=White, Angle=315, Intensity=30, Elevation=50
11. Selections/Invert
12. Effects/3D Effects/Drop Shadow with the following settings
H&V=0, Opacity=100, Blur=12
....And then Select None
13. Image/Add Borders and add a 1 pixel border in black
14. Image/Add Borders and add a 2 pixel border in white
15. Select the white border with your magic wand
16. Change your background to the gold beads pattern in your color palette using the settings Angle=0, Scale=100
Then flood fill your selected border with the gold beads and Select None...
17. Image/Add Borders and add a 1 pixel black border
18. Image/Add Borders and add a 20 pixel border in white
19. Select the white border with your magic wand
20. Edit/Paste and then Paste into selection
21. Effects/Texture Effects/Blinds
22. Effects/3D Effects/Inner Bevel and then Select None
23. Image/Add Borders and add a 1 pixel border in black
24. Image/Add Borders and add a 2 pixel border in white
25. Select the border with your magic wand
26. Flood fill with the gold beads and then select none
27. Image/Add Borders and add a 1 pixel border in black
28. Layers/Promote Background Layer
29. Image/Canvas Size and make it 600x600 Placement is in the Middle
30. Effects/3D Effects/Drop Shadow
31. Layers/New Raster Layer
32. Layers/Arrange/Send To Bottom
33. Choose a Dominant color from your graphic and set it as your foreground color in your Color Palette (this will be the background color of your stationery..
34. Flood Fill this new layer with the color you have chosen..
35. Open a new transparent raster image 575x10
36. Selections/Select All
37. Edit/Paste and then Paste into Selection (this should be your graphic) and then select none...
38. Adjust/Blur/Gaussian Blur at 20
39. Effects/Texture Effects/Blinds
40. Image/Add Borders and add a 2 pixel border in white
41. Select the white border with the magic wand
42. Flood Fill with the Gold Beads and then Select None
43. Edit/Copy
44. Back to your main image. Click on the top layer (in your layers palette) to make it the active layer and then go to Edit/Paste and then Paste as a new layer
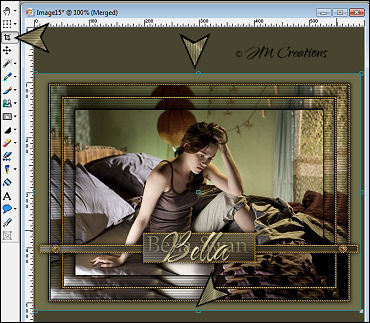
45. Click on your mover tool and lightly tap this new bar layer
46. Using your Down Arrow on your keyboard, tap the arrow 90 to 100 times to set this bar towards the bottom of your graphic. You can play with where it will look the best towards the bottom of your graphic (See my header as an example)
47. Effects/3D Effects/Drop Shadow
48. Open a new transparent raster image 200x50
49. Selections/Select All
50. Edit/Paste and then Paste into selection and Select None
51. Adjust/Blur/Gaussian Blur
52. Effects/Texture Effects/Blinds
53. Image/Add Borders and add a 2 pixel white border
54. Select the border with your magic wand
55. Flood fill with your gold beads and then Select None
56. Edit/Copy
57. Back to your main image and go to Edit/Paste and then Paste as a new layer
58. Click on your mover tool and click on this box lightly to select it
59. Using your Down arrow on your keyboard, tap around the same number of taps you previously used to set this box center over the bar layer (See my header for an example)
60. Effects/3D Effects/Drop Shadow
61. Bring up the Beaded Button that you minimized earlier and go to Edit/Copy
62. Back to your main image and go to Edit/Paste and Paste as a new layer
63. Using your mover tool, move this to the left side of your bar (see my header as an example)
64. Layers/Duplicate
65. Image/Mirror
66. Using a font or fonts of your choice, add text to the box. You can add the following drop shadow or one of your own.
V&H=1, Opacity=40, Blur=2, Color=Black
~Please note that for the dual layer fonts that I added to mine, the bottom layer looked best with the opacity lowered between 60 and 70. You may find you will need to do this too if you layer the fonts~
67. In your Layers Palette, Close out the bottom 2 layers by clicking on the eye. This should be your background layer and your frame layer. The only things visible should be the bar, box, beaded buttons, and your text....
68. Click on the top layer to make it the active layer and go to Layers/Merge/Merge Visible
69. Edit/Copy and then Edit/Paste and Paste as a new image
70. Back to your main image and open the bottom 2 layers again...
71. Layers/Merge/Merge Visible
72. Click on your Crop Tool and Crop around your graphic to get rid of the excess around it:
73. We are now done with your header.
If you would like to add a watermark, you should do so now. Then you can go to File/Export and Export to the JPEG Optimizer and Optimize at 15 or whatever your preference is...
Background:
1. Bring up the copy of the graphic you minimized earlier and go to Edit/Copy (you can now close this out)
2. Now make the New Image with the Bar and Text the active image..
3. Layers/New Raster Layer and send it to the bottom
4. Selections/Select All
5. Edit/Paste and Paste into Selection (this should be your graphic) and Select None...
6. Adjust/Blur/Gaussian Blur
7. Effects/Texture Effects/Blinds
8. Effects/Image Effects/Seamless Tiling and Tile using Corner and Horizontal (Transition=50)
9. Layers/Merge and Merge Visible
10. Image/Rotate/Free Rotate and Rotate it Left 90 Degrees. Make sure "All Layers" is checked
11. Image/Canvas Size..
Width=The width of your image + 4, Height=The height of your image, Placement is in the middle..
12. Layers/New Raster Layer and send it to the bottom
13. Flood Fill this layer with Black
14. Layers/Merge/Merge Visible
15. Image/Canvas Size and make it 1600. The Height stays the same (this should be the height of your image) Placement is Middle Left
~If your screen resolution is larger than 1600, please adjust it to suit your needs~
16. Effects/3D Effects/Drop Shadow:
V&H=0, Opacity=100, Blur=12, Color=Black, Shadow on new layer is checked
17. Effects/Image Effects/Seamless tiling using Corner and Vertical. Vertical Offset=0, Transition=50
18. Layers/Merge and Merge Visible
19. Layers/New Raster Layer and send it to the bottom
20. Flood Fill this layer with the color you chose (the same one you used in the background of your header)
21. Layers/Merge/Merge All (Flatten)
22. File/Export and Export to the JPEG Optimizer and Optimize at 15 or whatever your preference is...
Arrange in Letter Creator and you are done!!
Thanks so much for trying my tutorial. I hope your results were great ones :)
Please feel free to snag and share my tutorials after they have been released but please credit back to me in the footer..
If you are a tutorial writer and you would like to use my selections, masks, or other things please email me at: jodimcreations@gmail.com
I do allow it, but I require a link back in your tutorial to my website here:
http://www.jmcreationtuts.iwarp.com