Intentional Offset SB Tutorial
Intentional Offset SB Tutorial

Supplies Needed:
*PSP (This was done using 9 but other versions should work)
*Graphic of your choice (One that is wider than it is tall will work best)
*Mock's Windo Plugin Found Here
**Before we begin, please make sure that you have your plugin installed before opening PSP**
Let's Begin
1. Open your graphic in PSP and hit Shift + D to duplicate it. Close out the original.
2. Resize so that your graphic is 300 wide. Let the Height self adjust by making sure "Lock Aspect Ratio" is checked. Also make sure "Resize all layers" is checked.
3. Choose a dominating color from your graphic and set it as the Foreground Color.
4. Image/Add Borders and add a 1 pixel black border
5. Image/Add Borders and add a 5 pixel border in white.
6. Using your wand tool with the following settings, select your white border:
7. Flood fill with your foreground color
8. Effects/Edge Effects/Trace Contour
9. Layers/New Raster Layer
10. Flood fill with your foreground color
11. Effects/Texture Effects/Weave and use the default settings. And Select None
12. Image/Add Border and add a 1 pixel black border
13. Image/Add Border and add a 10 pixel border in white
14. Select the white border with your magic wand using the same settings as before and flood fill with your foreground color
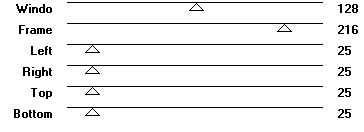
15. Go to Effects/Plugins/Mock/Windo and use the following settings:

16. Adjust/Add-Remove Noise/Add Noise and make sure Gaussian is checked and 10 strength and also make sure the Monochrome box is checked
17. Image/Add Border and add a 1 pixel black border
18. Image/Add Border and add a 5 pixel white border
19. Select the white border with your magic wand
20. Flood fill with your foreground color
21. Effects/Edge Effects/Trace Contour
22. Layers/Add New Raster Layer and Flood fill with your Foreground color
23. Effects/Texture Effects/Weave and use the default settings
24. Your border should still be selected and go to Image/Flip.
25. Selections/Select None
26. Layers/Merge/Merge Visible
27. Edit/Copy
28. Open a new image 1400 x the height of your graphic (If you do not know how to find this out, while your image is the active image go to Image/Image Information and it will give you the dimensions of it)
29. Back to your new image...Select/Select all
30. Paste/Paste into Selection
31. Select/Select None
32. Effects/Image Effects/Seamless Tiling and use the default settings
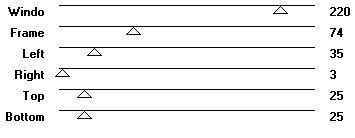
33. Effects/Plugin Effects/Mock/Windo with the following settings:

34. Effects/Edge Effects/Enhance
35. Layers/New Raster Layer
36. Flood Fill this new layer with your foreground color
37. Lower the opacity of this layer to 80
38. Merge/Merge Visible
39. Back to your framed image and go to Image/Resize and resize it by 90%
40. Adjust/Sharpness/Sharpen
41. Edit Copy
42. Back to your background image and Edit/Paste/Paste As A New Layer
43. Positon it towards the left side of your background image (leave a little room between the framed image and the left hand side).
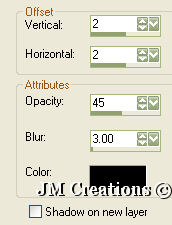
44. Effects/3D Effects/Drop Shadow and use the following settings:

45. Repeat drop shadow but change the vertical and horizontal to -2
46. Add any embelishment tubes you wish to your framed image and Also any text that you want. This is optional and you do not have to though....
47. File/Export/JPEG Optimizer and optimize at 15 - 20 or whatever works best for your graphic...
Arrange in Letter Creator and Credit Tutorial back to Jodi M at:
Thank you to my testers at Crazy Creative Creators!!
I hope you enjoyed my tutorial :0)
Please feel free to snag and share my tutorials after they have been released but please credit back to me in the footer..
If you are a tutorial writer and you would like to use my selections, masks, or other things please email me at jodimcreations@gmail.com
I do allow it, but I require a link back in your tutorial to my website here:
Thanks!!
Jodi M