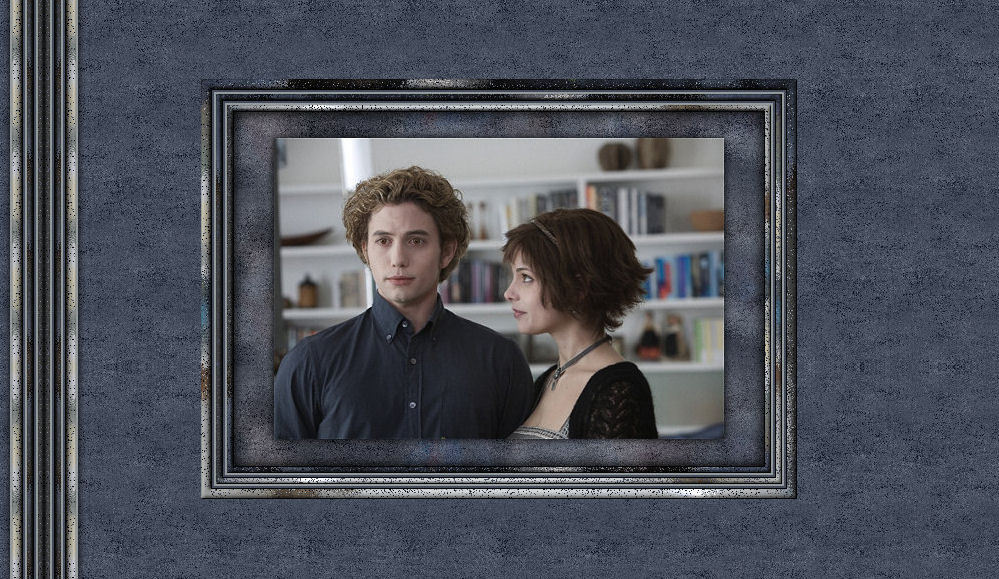
Scattered Stationery Tutorial
Scattered Stationery Tutorial


Things Needed:
**Paint Shop Pro (This was done using Version 9)
**A Graphic of your choice (one that is wider rather than tall will work best)
**AAA Filters - Scatter Here
**Filters Unlimited 2 Here
**A Graphic of your choice (one that is wider rather than tall will work best)
**AAA Filters - Scatter Here
**Filters Unlimited 2 Here
~Please note that all settings remain the same unless otherwise stated~
1. Open your graphic in PSP. Duplicate (Shift + D) once and close out original
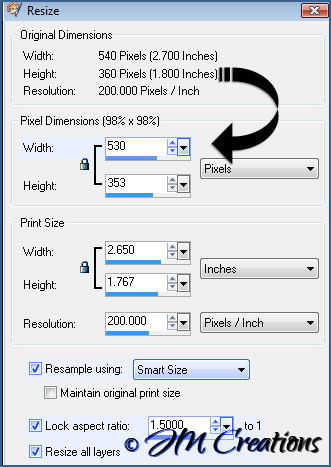
2. Your graphic needs to be no wider than 530 pixels in width. If it is larger please resize by
going to Image/Resize and set the width to 530. Resize using Smart Size, Make sure Lock Aspect Ratio, and Resize all layers is checked.
If your graphic is 530 pixels wide or smaller, this step is not needed:

3. If you have resized, you may want to sharpen by going to Adjust/Sharpness/Sharpen
4. Edit/Copy and then Edit/Paste and Paste as a new image. You can minimize one copy now, we will need it a little later..
5. Choose 2 colors from your graphic. Make sure one color you choose is darker than the other...
Set these colors as your Foreground and Background in your color palette.
6. Make your graphic the active image and go to Layers/Add New Raster Layer
7. Flood fill this layer with your darker color and then reduce the opacity to around 70
8. Layers/Merge/Merge Visible
9. Effects/Plugins/Filters Unlimited 2/Paper Textures/Wallpaper Coarse with the following settings:
Intensity=128, Lightness=99
10. Effects/Plugins/AAA Filters/Scatter with the following settings:
Radius=10, Opacity=100, and it should be set to Normal
11. Effects/Image Effects/Seamless Tile and tile using Corner and Vertical. Vertical Offset=0, Transition=50
12. Repeat Seamless Tiling but this time use the Default Settings
13. Image/Add Borders and add a 1 pixel symmetric border in Black
14. Image/Add Borders and add a 6 pixel symmetric border in white
15. Using your magic wand tool, select the white border
Wand Settings: Mode=Replace, Match Mode=RGB Value, Tolerance=0, Contiguous is checked, Feather=0, Anti-Alias is Not Checked
16. Edit/Paste/Paste Into Selection (This should be your graphic)
17. Effects/Plugins/AAA Filters/Scatter
18. Effects/3D Effects/Inner Bevel with the following settings:
Bevel 2, Width=5, Smoothness=0, Depth=5, Ambience=10, Shininess=0, Angle=315, Intensity=30, Elevation=50, Color=White
19. Selections/Invert
20. Effects/3D Effects/Cutout with the following settings:
Vertical and Horizontal=1, Opacity=80, Blur=20, Color=Black
21. Repeat Cutout but change Vertical and Horizontal to -1
22. Selections/Select None
23. Edit/Paste/Paste as a new layer (this should be your graphic)
24. Image/Resize and resize 85%. Make sure Resize All Layers is Not checked
25. Adjust/Sharpness/Sharpen
26. Effects/3D Effects/Drop Shadow with the following settings:
H&V=0, Opacity=100, Blur=12, Color=Black
27. Image/Add borders and add a 2 pixel border in your lighter color
28. Add a 2 pixel border in your darker color
29. Add a 1 pixel border in black
30. Add a 6 pixel border in white
31. Select border with your magic wand
32. Edit/Paste/Paste into selection (should be your graphic)
33. Image/Flip
34. Effects/Plugins/Scatter
35. Effects/3D Effects/Inner Bevel and then select none
36. Add a 2 pixel border in your lighter color
37. Add a 2 pixel border in your darker color
38. Add a 1 pixel border in black
39. Add a 10 pixel border in white
40. Select border with your magic wand
41. Edit/Paste/Paste into Selection (this should be your graphic)
42. Effects/Plugins/Scatter
43. Image/Mirror and then Image/Flip
44. Effects/3D Effects/Inner Bevel and then Select None
~We are now done with your header. You can add any accent tubes or text if you'd like and also your
watermark. When you are done, go to File/Export/ and export to the JPEG Optimizer and Optimize at
15 or whatever your preference is....
Do Not Close this out yet!! We will need it still.....
Background:
1. With your Header still active click on your Selection tool and then add the following
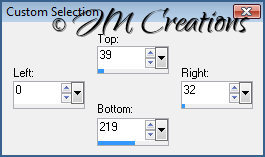
Custom Selection:
Left=0, Top=39, Bottom=219, Right=32
4. Edit/Copy and then Edit/Paste and Paste as a new image. You can minimize one copy now, we will need it a little later..
~If your graphic disappears from your clipboard at any point, please bring it back up and copy it again~
5. Choose 2 colors from your graphic. Make sure one color you choose is darker than the other...
Set these colors as your Foreground and Background in your color palette.
6. Make your graphic the active image and go to Layers/Add New Raster Layer
7. Flood fill this layer with your darker color and then reduce the opacity to around 70
8. Layers/Merge/Merge Visible
9. Effects/Plugins/Filters Unlimited 2/Paper Textures/Wallpaper Coarse with the following settings:
Intensity=128, Lightness=99
10. Effects/Plugins/AAA Filters/Scatter with the following settings:
Radius=10, Opacity=100, and it should be set to Normal
11. Effects/Image Effects/Seamless Tile and tile using Corner and Vertical. Vertical Offset=0, Transition=50
12. Repeat Seamless Tiling but this time use the Default Settings
13. Image/Add Borders and add a 1 pixel symmetric border in Black
14. Image/Add Borders and add a 6 pixel symmetric border in white
15. Using your magic wand tool, select the white border
Wand Settings: Mode=Replace, Match Mode=RGB Value, Tolerance=0, Contiguous is checked, Feather=0, Anti-Alias is Not Checked
16. Edit/Paste/Paste Into Selection (This should be your graphic)
17. Effects/Plugins/AAA Filters/Scatter
18. Effects/3D Effects/Inner Bevel with the following settings:
Bevel 2, Width=5, Smoothness=0, Depth=5, Ambience=10, Shininess=0, Angle=315, Intensity=30, Elevation=50, Color=White
19. Selections/Invert
20. Effects/3D Effects/Cutout with the following settings:
Vertical and Horizontal=1, Opacity=80, Blur=20, Color=Black
21. Repeat Cutout but change Vertical and Horizontal to -1
22. Selections/Select None
23. Edit/Paste/Paste as a new layer (this should be your graphic)
24. Image/Resize and resize 85%. Make sure Resize All Layers is Not checked
25. Adjust/Sharpness/Sharpen
26. Effects/3D Effects/Drop Shadow with the following settings:
H&V=0, Opacity=100, Blur=12, Color=Black
27. Image/Add borders and add a 2 pixel border in your lighter color
28. Add a 2 pixel border in your darker color
29. Add a 1 pixel border in black
30. Add a 6 pixel border in white
31. Select border with your magic wand
32. Edit/Paste/Paste into selection (should be your graphic)
33. Image/Flip
34. Effects/Plugins/Scatter
35. Effects/3D Effects/Inner Bevel and then select none
36. Add a 2 pixel border in your lighter color
37. Add a 2 pixel border in your darker color
38. Add a 1 pixel border in black
39. Add a 10 pixel border in white
40. Select border with your magic wand
41. Edit/Paste/Paste into Selection (this should be your graphic)
42. Effects/Plugins/Scatter
43. Image/Mirror and then Image/Flip
44. Effects/3D Effects/Inner Bevel and then Select None
~We are now done with your header. You can add any accent tubes or text if you'd like and also your
watermark. When you are done, go to File/Export/ and export to the JPEG Optimizer and Optimize at
15 or whatever your preference is....
Do Not Close this out yet!! We will need it still.....
Background:
1. With your Header still active click on your Selection tool and then add the following
Custom Selection:
Left=0, Top=39, Bottom=219, Right=32

2. Edit/Copy and then Edit/Paste and Paste as a new image (you can now either close out your header or minimize it)
3. Make your new selection the active image and go to Image/Canvas Size and make it 64x180..Positon is Middle Left
4. Layers/Duplicate
5. Image/Mirror
6. Image/Add Borders and Add a 2 Pixel border in your lighter color
7. Effects/Image Effects/Seamless Tiling and Tile using Corner and Vertical
Vertical Offset=0, Transition=50
8. Layers/Promote Background Layer
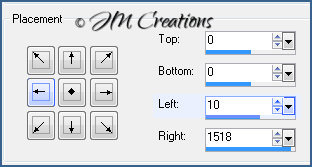
9. Image/Canvas Size and make it 1600 x 184. If your screen resolution is larger,
please adjust the width to suit your needs....
Placement is Middle Left and over where it says "Left" please change the number to 10

10. Effects/3D Effects/Drop Shadow using the following settings:
V&H=0, Opacity=100, Blur=12, Color=Black, Shadow on new layer is checked
11. Effects/Image Effects/Seamless Tiling and tile using Corner and Vertical
12. Layers/Merge/Merge Visible
13. Layers/New Raster Layer
14. Layers/Arrange/Send To Bottom
15. Flood Fill this layer with your darker color.
16. Effects/Plugins/Filters Unlimited 2/Paper Textures/Wallpaper, Coarse
17. Effects/Plugins/AAA Filters/Scatter
18. Effects/Image Effects/Seamless Tiling and Tile at Default
19. Layers/Merge/Merge All (Flatten)
20. File Export and Export to the JPEG Optimizer and Optimize at 15 or whatever your preference is...
Arrange in Letter Creator and you are done!!
Thanks so much for trying my tutorial. I hope your results were great ones :)
Please feel free to snag and share my tutorials after they have been released but please credit back to me in the footer..
If you are a tutorial writer and you would like to use my selections, masks, or other things please email me at: jodimcreations@gmail.com
I do allow it, but I require a link back in your tutorial to my website here:
http://www.jmcreationtuts.iwarp.com
V&H=0, Opacity=100, Blur=12, Color=Black, Shadow on new layer is checked
11. Effects/Image Effects/Seamless Tiling and tile using Corner and Vertical
12. Layers/Merge/Merge Visible
13. Layers/New Raster Layer
14. Layers/Arrange/Send To Bottom
15. Flood Fill this layer with your darker color.
16. Effects/Plugins/Filters Unlimited 2/Paper Textures/Wallpaper, Coarse
17. Effects/Plugins/AAA Filters/Scatter
18. Effects/Image Effects/Seamless Tiling and Tile at Default
19. Layers/Merge/Merge All (Flatten)
20. File Export and Export to the JPEG Optimizer and Optimize at 15 or whatever your preference is...
Arrange in Letter Creator and you are done!!
Thanks so much for trying my tutorial. I hope your results were great ones :)
Please link tutorial back to me at:
http://www.jmcreationtuts.iwarp.com
http://www.jmcreationtuts.iwarp.com
Please feel free to snag and share my tutorials after they have been released but please credit back to me in the footer..
If you are a tutorial writer and you would like to use my selections, masks, or other things please email me at: jodimcreations@gmail.com
I do allow it, but I require a link back in your tutorial to my website here:
http://www.jmcreationtuts.iwarp.com