It's My Name Stationery Tutorial
It's My Name Stationery Tutorial

Things Needed:
**Paint Shop Pro (This was done using Version 9)
**A Graphic or Misted Tube of your choice (graphic should be at least 450x400 in size)
**A Graphic or Misted Tube of your choice (graphic should be at least 450x400 in size)
**Font or Fonts of your choice (For Text)
**My Selections (Found in my Supplies Zip)
**My Supplies**
~Please note that all settings remain the same unless otherwise stated~
~Before Opening up PSP, Please put the Selections in your PSP/Selections folder~
The Header
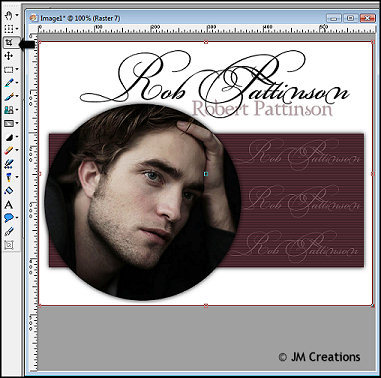
1. Open your graphic or misted tube in PSP. Duplicate once (Shift + D) and close out original...
2. Click on your eye dropper tool. Choose 2 colors from your graphic or tube (Set one as the foreground and one as the background). One color should be a medium/dark color (or black) and the other another medium or shade lighter than your other chosen color. Really bright/light colors aren't recommended...
You can now minimize your graphic or tube...
~If your graphic disappears from your clipboard at any point, please bring it back up and copy it again~
3. Open a new transparent raster image 600x600 and flood fill with white...
Flood Fill Tool Settings: Match Mode=None, Blend Mode=Normal, Opacity=100
~Optional choice here for your background. You can leave it white and have a white background stationery like mine or you can add a color to the background instead~
4. Layers/New Raster Layer
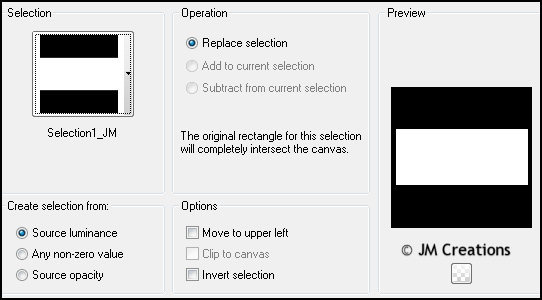
5. Selections/Load-Save Selections/Load Selections From Disk and load the Selection1_JM Selection
6. Flood Fill with one of your color choices
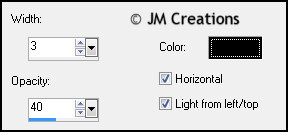
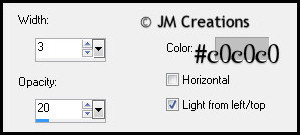
7. Effects/Texture Effects/Blinds with the following settings:
Width=3, Opacity=40, Color=Black, Horizontal and Light from Top/Left should also be checked:
8. Selections/Select None
9. Effects/3D Effects/Drop Shadow with the following settings
H&V=0, Opacity=100, Blur=12
10. Layers/New Raster Layer
11. Selections/Load-Save Selections/Load Selections From Disk and load the Selection2_JM Selection
12. If you are using a graphic, continue with these instructions. If you are using a misted tube, please skip ahead to step number 13....
Instructions when using a graphic:
**Edit/Paste and Paste as a new layer (This should be your graphic we copied to the clipboard earlier. If it has disappeared from the clipboard, please bring it up and copy it again)
**Using your mover tool, position your graphic so that the focal point of the image fits within the circle good.
**When you have it positioned to where you want it, go to Selections/Invert and then Edit/Clear....
You can then Select None and skip to step 14...
13. Instructions when using a misted tube:
**Click on your flood fill tool and flood fill with the other color you have chosen
(This should be different from the first color you used)
**Edit/Paste and Paste as a new layer (this should be your tube. If it has disappeared from your clipboard, please bring it up and copy it again)
**Using your mover tool, position your tube within the circle
**When you have the tube where you would like it go to Selections/Invert and then Edit/Clear
You can then Select None and continue on to step 14...
14. Effects/3D Effects/Drop Shadow
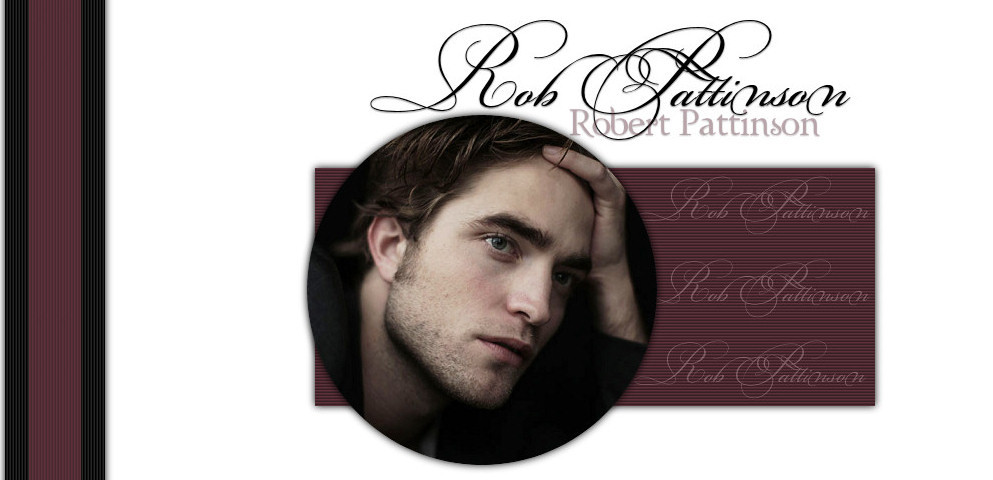
15. Now it's time to add your text! You can add it inside the box and also above or below the graphic (see mine as an example). It's your choice to do it how you'd like to....
You can use a drop shadow of your choice for your text or use the one I do:
V=1, H=0, Opacity=50, Blur=2, Color=Black
You may also use your mover tool to move your graphic circle if you'd like to fit better with your text ect....
16. You can add any accent tubes if you'd like, and also your watermark. When you are done go to Layers/Merge/Merge Visible
17. Using your Crop Tool, Crop around the outside of your graphic to get rid of the excess:
18. File/Export and Export to the JPEG Optimizer and Optimize at 15 or whatever your preference is...
The Background:
1. Open a new transparent raster image 100x300
2. Flood fill with your darkest color choice or Black
3. Effects/Texture Effects/Blinds
(Settings if you are using the color Black):
If you are using a medium color you can use the same settings as above, except the color should be black (Or a darker color).
4. Effects/Image Effects/Seamless Tiling with the following settings:
Corner & Vertical, Vertical offset=0, Transition=50
5. Selections/Select All
6. Selections/Modify/Contract by 24
7. Layers/New Raster Layer
8. Flood fill with your other color choice and then select none
9. Effects/Texture Effects Blinds
10. Effects/Image Effects/Seamless Tiling
11. Effects/3D Effects/Drop Shadow using the following settings:
V&H=0, Opacity=100, Blur=12, Color=Black, Shadow on new layer should be checked
12. Effects/Image Effects/Seamless Tiling
13. Layers/Merge/Merge Visible
14. Image/Canvas Size and make it 1700x300 (Or whatever your preference is) Placement: Click on the left middle arrow and then change the Left settings to 10
15. Effects/3D Effects/Drop Shadow using the same settings
16. Effects/Image Effects/Seamless Tiling
17. Layers/Merge/Merge Visible
18. Layers/New Raster Layer
19. Layers/Arrange/Send To Bottom
20. Flood Fill with white or the same color you used for the background of your header...
21. File/Export to the JPEG Optimizer and Optimize at 10-15 or whatever your preference is and that's it!!
Arrange in Letter Creator and you are done!!
Thanks so much for trying my tutorial. I hope your results were great ones :)
Please feel free to snag and share my tutorials after they have been released but please credit back to me in the footer..
If you are a tutorial writer and you would like to use my selections, masks, or other things please email me at
jodimcreations@gmail.com
I do allow it, but I require a link back in your tutorial to my website here:
http://www.jmcreationtuts.iwarp.com