Orlando Boxed Tag Tutorial
Orlando Boxed Tag Tutorial

**Things Needed**
**No Outside Filters Needed**
* Paint Shop Pro (I used 9 but should work in 8 and 10 also)
* A graphic of your choice.. Make sure it is no wider than 500 ( A graphic that is a square shape and has the same or near the same width and length works best)
* A nice complimenting tube that goes with your graphic. One that has similar colors as your graphic will work best. Please do not use a misted tube...Also make sure your tube is no wider than 300 (If it is, you can resize it later to fit)
* My Selections found Here (Please unzip and extract to your PSP Selections Folder)
Let's Get Started
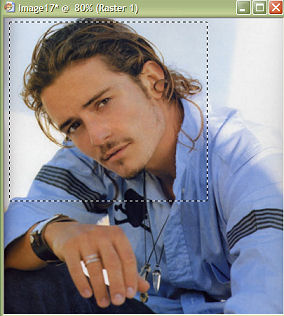
1. Open your tube and graphic in Paint Shop Pro
2. Choose 2 colors from your graphic that compliment each other and set your lighter color as your foreground color and your darker one as your background color
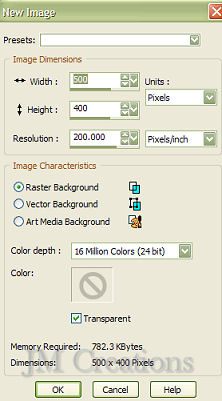
3. Open a new image 500x400
4. In your color palette, change your foreground to the gradient foreground/background gradient with these settings:
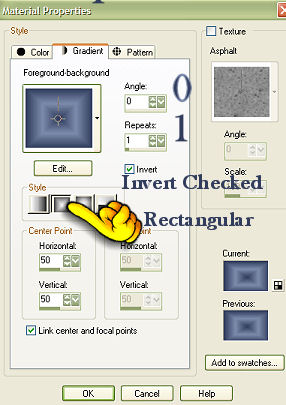
5. Flood fill your new image using the gradient
6. Highlight your graphic and Edit and Copy
7. Back to your new image, go to Layers/New Raster Layer
8. Selections/Select all
9. Selections/Paste into Selection
10. Select None
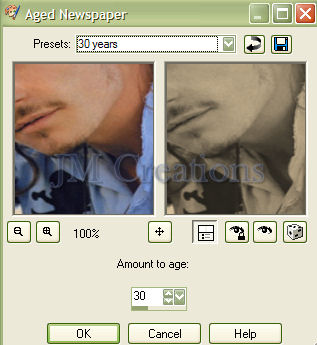
11. Effects/Artistic Effects/Aged Newspaper and from the pulldown box at the top choose 30 years:
6. Highlight your graphic and Edit and Copy
7. Back to your new image, go to Layers/New Raster Layer
8. Selections/Select all
9. Selections/Paste into Selection
10. Select None
11. Effects/Artistic Effects/Aged Newspaper and from the pulldown box at the top choose 30 years:
12. Lower opacity of this layer to 30
13. Layers/New Raster Layer
14. Selections/Load-Save Selections/Load Selections From Disk and choose the Box1_JM selection
**Do Not Deselect**
15. Flood Fill inside of box with your Dark Color
16. Selections/Modify/Contract by 4 and hit your Delete key once
17. Now go back to your graphic and using your Selections Tool With the settings Rectangle/Replace/Feather 2/and Anti-Alias checked, Select around the main part of your graphic (The part you want to see in the box)
18. Now Edit and Copy
19. Back to your other image, Edit/Paste and Paste into Selection
20. Layer/New Raster Layer
21. Effects/3D Effects/Cutout with the settings:
Vertical and Horizontal 2/ Opacity 35/ Blur 2
22. Layers/New Layer
23. Effects/3D Effects/Cutout with the settings:
Vertical and Horizontal -2 / Opacity 35/ Blur 2
24. Selections/Select None
25. Layers/New Raster Layer
26. Selections/Load Save Selections/Load Selections From Disk and select the BarsUnderBox1_JM Selections
27. Flood Fill these Selected bars with your light color
28. Effects/3D Effects/Inner Bevel with these settings:

29. Effects/3D Effects/Drop Shadow using the settings Vertical & Horizontal 2/ Opacity 50/ Blur 2
30. Selections/Select None
31. Highlight your tube and Edit and Copy
32. Back to your new image and Paste as a new layer
33. Position the tube on the right side of the box with your graphic in. If your tube is to large you can resize it by going to "Image/ Resize"....and resize accordingly (I usually start my resize by using 80%) . Make sure Resize all layers is Not Checked!! You may also need to sharpen your tube now by going to Adjust/Sharpen
34. Once you have your tube the way you like it and you have moved it with the Mover tool along side your graphic box go to Effects/3D Effects/Drop Shadow with the settings:
Horizontal and Vertical 3/ Opacity 50/ Blur 5
(You can add more accent tubes if you'd like just remember to much may be overkill...)
35. Layers/New Raster Layer and add your Watermark
36. Layers/Merge Visible
37. Image/Add Borders and add a 2 pixel border using your light color
38. Image/Add Borders and add a 2 pixel border using your dark color
39. Image/Add Borders and add a 4 pixel border using your light color
40. Selections/Select All
41. Selections/Modify/Contract by 4
42. Selections/Invert
43. Effects/3D Effects/Inner Bevel and use the same settings as we did before
44. You can add text if you'd like to now...It's up to you. If you add text add a drop shadow to it using the settings: Horizontal and Vertical 2/ Opacity 50/ Blur 2
45. Resize to your liking. If using in a stationery you may not want to resize :0)
Please remember to sharpen if you do resize by going to Adjust and Sharpen...
46. Export to the JPEG Optimizer at 20 and save & You are done!!
I hope you enjoyed my tutorial :0)
Please link back to Jodi M at http://jmcreationtuts.iwarp.com
Thank you to the tutorial testers at Crazy Creative Creators!! You all do a wonderful job!
Please feel free to snag and share my tutorials after they have been released but please credit back to me in the footer..
If you are a tutorial writer and you would like to use my selections, masks, or other things please email me at jodimcreations@gmail.com
I do allow it, but I require a link back in your tutorial to my website here:
Thanks!!
Jodi M