Seamless Separated SB Tutorial
Seamless Separated SB Tutorial


Supplies Needed:
* Psp (this was done using 9 but should work in other versions)
* Tube of your choice
No Outside Plugins needed :0)
Let's Get Started:
1. Open your tube in PSP and press Shift + D to copy it. Close out original tube.
2. Choose two colors from your tube. One light color as the foreground and a dark color as your background
3. Resize your tube so that it is no bigger than 300 wide. Length will self adjust..
*Make sure Lock Aspect Ratio and Resize all layers are checked*
4. Rename this layer by right clicking on it in your layer palette and name it "Tube"
5. Go to Layers/New Raster Layer and name this layer "Layer 2"
6. Layers/Arrange/Send To Bottom
7. Make sure your top/tube layer is highlighted and go to Effects/3D Effects/Drop Shadow and use the following settings:
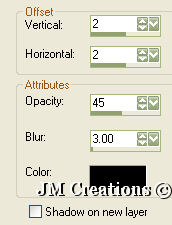
7. Repeat drop shadow except change the Vertical and Horizontal to -2
8. Make sure your bottom layer is highlighted and flood fill with your light color.
9. Go To Adjust/Add-Remove Noise/Add Noise with the following settings: (Uniform/Monochrome/15)
10. Image/Canvas Size and make the size 1400 width by the height of your image/tube. Placement left middle arrow Make sure lock aspect ratio is Not checked
If your screen resolution is larger than 1400 in width, you can adjust this number to accomodate your needs
11. Layers/New Raster Layer and name this layer "Background"
12. Layers/Arrange/Send To Bottom
13. Flood fill this layer with your dark color
14. Effects/Texture Effects/Fine Leather with the follow settings:
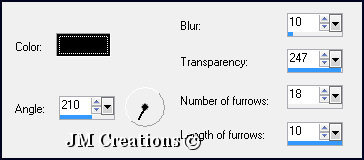
*Color Black/Angle 210/Blur 10/Transparency 247/Number of Furrows 18/Lengh of Furrows 10*
15. Effects/Image Effects/Seamless Tiling and Seamless tile using the default settings
16. Open a new image with the following size:
Width=10 x the height of your graphic/tube.
17. Flood fill this new image with your dark color.
18. Adjust/Add Remove noise/Add noise with the following settings: Gaussian/Monochrome/25
19. Effects/3D Effects/Inner Bevel and use the following settings:
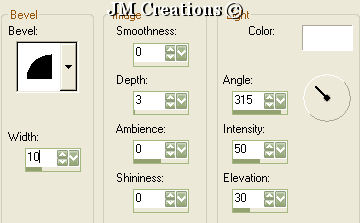
20. Edit/Copy
21. Back to your image with your tube on it and make sure you highlight the layer directly under your tube layer. If you did everything correctly, it should be Layer 2 that you need to highlight. Now go to:
Edit/Paste/Paste as a new layer
22. Position this bar so that it is right on the seam between your side border color and your background. Notice your tube layer may overlap it...This is fine and the effect I intended. If your tube does not overlap the bar it's ok too. It just depends on what kind of tube is used
23. Effects/3D Effects/Drop Shadow with the following settings:
V&H=0, Opacity=100, Blur=12, Color=Black
24. Now go to Effects/Image Effects/Seamless Tiling and use the following settings:
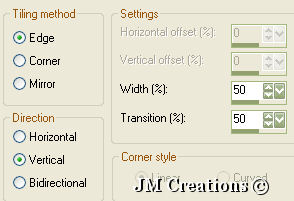
25. Layers/Merge/Merge Visible
26. Add your watermark and any other text if you'd like to.
If you choose to do any text, you can give it a drop shadow of Horizontal and Vertical 1/Opacity 25/Blur 2 *Or whatever works best for you*
27. File/Export/JPEG Optimizer and optimize at 20. Name and save it and assemble in Letter Creator.
*For help on Assembling in Letter Creator see below*
Assemble in Letter Creator:
1. Open Letter Creator and in the Body tab click on "Image" and browse to where you have just saved the graphic we made.
2. Click "Tile"
3. Adjust your margins and choose your font and font color. See settings below:
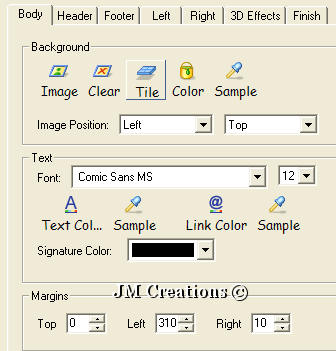
**Make sure your Text and Link colors will show up nicely against your background. I always try to make sure I use colors that go nicely or match with the colors of my stationery. Bright Gawdy Bold lettering can be a bit much on the eyes, so choose colors that are pleasing to the eye also :0) **
4. Go to the Footer Tab and put your information in such as "Created By......." and also the font you used such as "Font: Comic Sans MS". Make sure you also put the tutorial link such as "Seamless Separated SB Tutorial" ...Highlight the text that says Seamless Separated SB Tutorial and click on "Link" and type or copy and past in:
5. Now go to the "Finish" tab and name your stationery and export it to Incredimail and also save it if you wish :0)
You are all done!!
Thank you so much for trying my tutorial...
I hope you enjoyed it and will use the simple little techniques I have showed you when you want to make a fast, quick and simple stat!!
Thank you to my testers at Crazy Creative Creators!!
Please feel free to snag and share my tutorials after they have been released but please credit back to me in the footer..
If you are a tutorial writer and you would like to use my selections, masks, or other things please email me at jodimcreations@gmail.com
I do allow it, but I require a link back in your tutorial to my website here:
Jodi M